Chapter 12: Window Theory
In the last chapter, we added a window to our application. This involved quite a lot of code, but we didn’t really explain much of it in any detail; now is the time to rectify that. This chapter is going to be quite theory-heavy – it would be sensible to experiment with the concepts as we go through them, using the code from Download 11.3 as a base to work from.
The first stage to creating a window is to define it in a wimp_window block suitable for passing to Wimp_CreateWindow. We created ours in win_initialise() as part of Listing 11.1, and the code in question looked like this:
wimp_window window_definition;

window_definition.visible.x0 = 200;
window_definition.visible.y0 = 200;
window_definition.visible.x1 = 600;
window_definition.visible.y1 = 600;
window_definition.xscroll = 0;
window_definition.yscroll = 0;
window_definition.next = wimp_TOP;
window_definition.flags = wimp_WINDOW_NEW_FORMAT |
                wimp_WINDOW_MOVEABLE | wimp_WINDOW_AUTO_REDRAW |
                wimp_WINDOW_BOUNDED_ONCE | wimp_WINDOW_BACK_ICON |
                wimp_WINDOW_CLOSE_ICON | wimp_WINDOW_TITLE_ICON |
                wimp_WINDOW_TOGGLE_ICON | wimp_WINDOW_VSCROLL |
                wimp_WINDOW_SIZE_ICON | wimp_WINDOW_HSCROLL;
window_definition.title_fg = wimp_COLOUR_BLACK;
window_definition.title_bg = wimp_COLOUR_LIGHT_GREY;
window_definition.work_fg = wimp_COLOUR_BLACK;
window_definition.work_bg = wimp_COLOUR_VERY_LIGHT_GREY;
window_definition.scroll_outer = wimp_COLOUR_MID_LIGHT_GREY;
window_definition.scroll_inner = wimp_COLOUR_VERY_LIGHT_GREY;
window_definition.highlight_bg = wimp_COLOUR_CREAM;
window_definition.extra_flags = 0;
window_definition.extent.x0 = 0;
window_definition.extent.y0 = -1200;
window_definition.extent.x1 = 1200;
window_definition.extent.y1 = 0;
window_definition.title_flags = wimp_ICON_TEXT |
                wimp_ICON_BORDER | wimp_ICON_HCENTRED |
                wimp_ICON_VCENTRED | wimp_ICON_FILLED;
window_definition.work_flags = wimp_BUTTON_NEVER << wimp_ICON_BUTTON_TYPE_SHIFT;
window_definition.sprite_area = wimpspriteop_AREA;
window_definition.xmin = 0;
window_definition.ymin = 0;
strncpy(window_definition.title_data.text, "Hello World!", 12);
window_definition.icon_count = 0;
The wimp_window structure is a block of memory which is at least 92 bytes long once all of the sub-structures within it are ‘unwound’; OSLib defines it like this:
struct wimp_window {
        os_box                  visible;
        int                     xscroll;
        int                     yscroll;
        wimp_w                  next;
        wimp_window_flags       flags;
        wimp_colour             title_fg;
        wimp_colour             title_bg;
        wimp_colour             work_fg;
        wimp_colour             work_bg;
        wimp_colour             scroll_outer;
        wimp_colour             scroll_inner;
        wimp_colour             highlight_bg;
        wimp_extra_window_flags extra_flags;
        os_box                  extent;
        wimp_icon_flags         title_flags;
        wimp_icon_flags         work_flags;
        osspriteop_area         *sprite_area;
        short                   xmin;
        short                   ymin;
        wimp_icon_data          title_data;
        int                     icon_count;
        wimp_icon               icons[UNKNOWN];
};
We’ll work our way through the contents over the coming chapters, but it’s worth noting first that OSLib defines UNKNOWN as
#define UNKNOWN 1
This is a little odd, because we don’t know how long the array might be, but is in line with the way that flexible arrays were handled in the days of C90. The arrival of the C99 standard gave us a proper implementation, but OSLib’s heritage leaves us with this ‘hack’.
For the example code here, this doesn’t matter too much: when we declare the window_definition variable, we simply get an array with one entry at the end of the structure, which in this case we won’t actually be using anyway. In fact, as we’ll see, it’s very rare to declare wimp_window variables in code – pointers to blocks are far more common.
More significant is the fact that this approach to defining an array of unknown length can trip up the C compiler, causing it to issue a warning of a possible “out-of-bound offset” when accessing members of the icons[] array. These will need to be ignored, unless the code can be written in such a way as to avoid them being generated.
The window dimensions
A lot of a window’s definition is concerned with its dimensions: where it appears on screen and how big its work area is. The area that a window occupies on screen is known as its visible area, and is defined by an os_box struct. We first met these when creating an iconbar icon back in Chapter 6; they hold two pairs of x and y coordinates in the form (x0,y0) and (x1,y1):
struct os_box {
        int             x0;
        int             y0;
        int             x1;
        int             y1;
};

typedef struct os_box os_box;
For the visible area, the coordinates used are treated as OS units relative to the screen origin at the bottom left of the iconbar. This can be seen graphically in Figure 12.1.
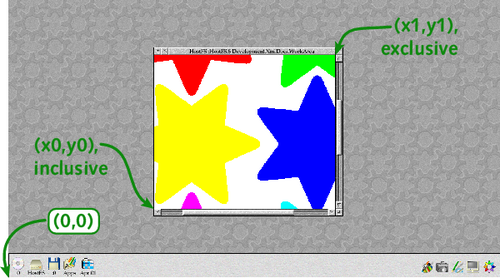
Figure 12.1: A window’s Visible Area is defined in terms of screen coordinates
When we gave the visible area as
window_definition.visible.x0 = 200;
window_definition.visible.y0 = 200;
window_definition.visible.x1 = 600;
window_definition.visible.y1 = 600;
we were telling the Wimp that the bottom-left pixel inside the window’s frame was at (200,200) and that the top-right pixel just outside the window (in other words in the bottom-left of the Toggle Size button’s border) was at (600,600).
These coordinates are where the window first opens; once the user has moved it around, they are forgotten. You can see how they affect the opening position of the window by changing the numbers given in the four lines above, re-compiling the code and looking at where the window appears when it is first opened.
The next set of coordinates that must be specified are the work area extent. The work area is the area ‘inside’ the window, and the visible area can be thought of as a view on to some or all of the work area. Figure 12.1 above showed a window displaying part of a graphic on the desktop; Figure 12.2 shows how this visible area of the window might relate to the full graphic in its work area.
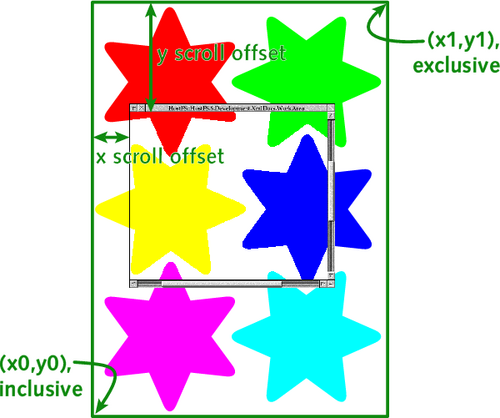
Figure 12.2: The Work Area of a window can be larger than its Visible Area
As with the visible area, the work area is defined by its bottom-left and top-right coordinates – but unlike the visible area, they’re not really referenced to a specific origin. Conventionally x0 and y1 – which give the top-left of the work area – are both set to zero; this means that the x coordinates increase in a positive direction when moving from left to right, and the y coordinates decrease in a negative direction when moving from top to bottom. We defined (x0,y0) to be (0,−1200) and (x1,y1) to be (1200,0):
window_definition.extent.x0 = 0;
window_definition.extent.y0 = -1200;
window_definition.extent.x1 = 1200;
window_definition.extent.y1 = 0;
which means that the top-left of the window’s work area has coordinates (0,0) and the bottom-right (1200,−1200). Our resulting work area is therefore 1200 OS units square.
The (0,0) ‘origin’ doesn’t have to be at the top-left of the work area, however. We could achieve the same size of area, but with coordinate (0,0) in its centre, by defining the extent as:
window_definition.extent.x0 = -600;
window_definition.extent.y0 = -600;
window_definition.extent.x1 = 600;
window_definition.extent.y1 = 600;
However, as can be seen from Figure 12.3, the location of the scroll bars when the window opens will be affected.
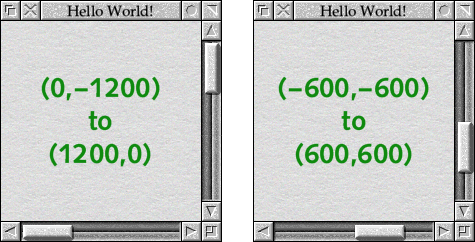
Figure 12.3: The Work Area affects the starting position of the Scroll Bars
The reason for this are two more values in the definition, which determine the x and y scroll offsets.
window_definition.xscroll = 0;
window_definition.yscroll = 0;
The Wimp defines these two values as giving the work area coordinate which appears at the top-left of the visible area. This is why the convention of putting (0,0) at the top-left of the work area makes a lot of sense: when the window is scrolled fully up and left the x and y scroll offsets will both be zero.
The user can resize our window, and the Wimp will apply some constraints to what they can do. The largest that the window can be dragged out will be so that the visible area matches the work area extent. At the other extreme, window_definition.xmin and window_definition.ymin set the minimum dimensions in OS units to which the window can be resized. We’ve set the limits to zero, which are special values:
window_definition.xmin = 0;
window_definition.ymin = 0;
If window_definition.xmin is zero, the window’s width can’t be shrunk to less than the width of the title bar text; setting window_definition.ymin to zero applies a limit based on any verical scroll bars which are present.
That’s the horizontal and vertical position of our window sorted out, but there’s still the question of the ‘third dimension’ to consider: where our window appears in the window stack. On RISC OS, windows on the desktop have a defined order in which they appear in the ‘pile’ – when we ask the Wimp to open our window, we need to say where in the ‘pile’ it should go.
The Wimp tracks this by identifying the window which appears directly on top of ours. When opening a window, we usually want it to appear at the top of the heap, so we specify another ‘special’ window handle – named wimp_TOP by OSLib – to indicate this.
#define wimp_TOP ((wimp_w) 0xFFFFFFFFu)

window_definition.next = wimp_TOP;
Changing appearances
The next set of attributes that we can change for our window are its colours. The wimp_window structure contains a set of values which control various parts of the window:
window_definition.title_fg = wimp_COLOUR_BLACK;
window_definition.title_bg = wimp_COLOUR_LIGHT_GREY;
window_definition.work_fg = wimp_COLOUR_BLACK;
window_definition.work_bg = wimp_COLOUR_VERY_LIGHT_GREY;
window_definition.scroll_outer = wimp_COLOUR_MID_LIGHT_GREY;
window_definition.scroll_inner = wimp_COLOUR_VERY_LIGHT_GREY;
window_definition.highlight_bg = wimp_COLOUR_CREAM;
Included are foreground and background colours for the title bar and work area, a highlight colour for the title bar, and colours for the scroll bars. Values can be selected from the full range of the default Wimp palette, which OSLib defines as follows:
#define wimp_COLOUR_WHITE               ((wimp_colour) 0x0u)
#define wimp_COLOUR_VERY_LIGHT_GREY     ((wimp_colour) 0x1u)
#define wimp_COLOUR_LIGHT_GREY          ((wimp_colour) 0x2u)
#define wimp_COLOUR_MID_LIGHT_GREY      ((wimp_colour) 0x3u)
#define wimp_COLOUR_MID_DARK_GREY       ((wimp_colour) 0x4u)
#define wimp_COLOUR_DARK_GREY           ((wimp_colour) 0x5u)
#define wimp_COLOUR_VERY_DARK_GREY      ((wimp_colour) 0x6u)
#define wimp_COLOUR_BLACK               ((wimp_colour) 0x7u)
#define wimp_COLOUR_DARK_BLUE           ((wimp_colour) 0x8u)
#define wimp_COLOUR_YELLOW              ((wimp_colour) 0x9u)
#define wimp_COLOUR_LIGHT_GREEN         ((wimp_colour) 0xAu)
#define wimp_COLOUR_RED                 ((wimp_colour) 0xBu)
#define wimp_COLOUR_CREAM               ((wimp_colour) 0xCu)
#define wimp_COLOUR_DARK_GREEN          ((wimp_colour) 0xDu)
#define wimp_COLOUR_ORANGE              ((wimp_colour) 0xEu)
#define wimp_COLOUR_LIGHT_BLUE          ((wimp_colour) 0xFu)
#define wimp_COLOUR_TRANSPARENT         ((wimp_colour) 0xFFFFFFFFu)
There’s no problem experimenting with these values, but with the advent of modern versions of the Wimp which use textured bitmaps to make up the window furniture, an increasing number of the colours have little or no effect because the parts of the window that they control are no longer visible – being hidden behind the new window tool sprite designs.
There’s also the important fact that all of these colours are tightly defined by the Style Guide, which is supplied electronically with the DDE and can be purchased from RISC OS Open in printed form. The only value which should be changed in normal cases is window_definition.work_bg – and even this should remain as wimp_COLOUR_VERY_LIGHT_GREY most of the time (including in all dialogue boxes).
Aside from its colours, the window’s appearance can be changed by using some of the window flags and extended window flags stored in window_definition.flags and window_definition.extra_flags respectively:
window_definition.flags = wimp_WINDOW_NEW_FORMAT |
                wimp_WINDOW_MOVEABLE | wimp_WINDOW_AUTO_REDRAW |
                wimp_WINDOW_BOUNDED_ONCE | wimp_WINDOW_BACK_ICON |
                wimp_WINDOW_CLOSE_ICON | wimp_WINDOW_TITLE_ICON |
                wimp_WINDOW_TOGGLE_ICON | wimp_WINDOW_VSCROLL |
                wimp_WINDOW_SIZE_ICON | wimp_WINDOW_HSCROLL;
window_definition.extra_flags = 0;
The flags control many aspects of a window’s behaviour, and OSLib defines constants for all of them; as with all flags words, the required individual bits for the two fields are bitwise-ORed together to produce the numbers to be stored in the variables. Flags which are bits within window_definition.flags have the type wimp_window_flags; those which are bits within window_definition.extra_flags have the type wimp_extra_window_flags. For now we’re not setting any exended window flags, so the code above sets window_definition.extra_flags to be zero.
One window flag which must always be included is wimp_WINDOW_NEW_FORMAT:
#define wimp_WINDOW_NEW_FORMAT ((wimp_window_flags) 0x80000000u)
It indicates that the other window flags in window_definition.flags follow the “new format” and, in this context, that means “RISC OS”. The flag was added in when Acorn moved on from the original Arthur operating system in 1989, and it is very unlikely that there would ever be a situation in a modern application where it would not be set.
The extended window flags in window_definition.extra_flags started to be added in RISC OS 4, so we’re moving into areas which diverged when RISC OS 4 and RISC OS 5 came into being. Things aren’t as bad as they might appear however: flags have the same meaning on all branches of RISC OS, so all that changes is whether or not they’re implemented. Those which are not implemented are ignored by the Wimp, so it’s safe to set flags for use on those branches of the OS which support them.
The remaining flags in the two fields fall into a number of distinct groups; the first that we’ll consider controls which pieces of window furniture are applied to the window:
#define wimp_WINDOW_BACK_ICON                   ((wimp_window_flags) 0x1000000u)
#define wimp_WINDOW_CLOSE_ICON                  ((wimp_window_flags) 0x2000000u)
#define wimp_WINDOW_TITLE_ICON                  ((wimp_window_flags) 0x4000000u)
#define wimp_WINDOW_TOGGLE_ICON                 ((wimp_window_flags) 0x8000000u)
#define wimp_WINDOW_VSCROLL                     ((wimp_window_flags) 0x10000000u)
#define wimp_WINDOW_SIZE_ICON                   ((wimp_window_flags) 0x20000000u)
#define wimp_WINDOW_HSCROLL                     ((wimp_window_flags) 0x40000000u)
Each of these, if present, turns on one of the pieces of furniture: the iconise button, which doesn’t have its own flag, is controlled by wimp_WINDOW_CLOSE_ICON and appears when the close button is displayed (and the user has configured the button on across the desktop).
The window’s appearance can also be modified by a couple of the extended window flags stored in window_definition.extra_flags. OSLib defines the following two constants:
#define wimp_WINDOW_NEVER3D                     ((wimp_extra_window_flags) 0x4u)
#define wimp_WINDOW_ALWAYS3D                    ((wimp_extra_window_flags) 0x8u)
On RISC OS 4, users are given the option to make their window borders three dimensional across the desktop. Since “one size fits all” isn’t always a good plan, individual windows can over-rule the user: setting the wimp_WINDOW_NEVER3D flag will ensure that the window doesn’t get a 3D border, while wimp_WINDOW_ALWAYS3D ensures that it always has one. As with so many of these options, use sparingly and – if in doubt – leave these two flags unset and let the user decide.
Finally, in this group of flags, are two which control the way in which the window colours above are interpreted by the Wimp:
#define wimp_WINDOW_REAL_COLOURS                        ((wimp_window_flags) 0x400u)
#define wimp_WINDOW_USE_TITLE_VALIDATION_COLOURS        ((wimp_extra_window_flags) 0x1u)
#define wimp_WINDOW_USE_TITLE_VALIDATION_STRING         ((wimp_extra_window_flags) 0x1u) /* Preferred */
For now, these can both safely be left un-set.
Moving the window around
Another group of flags determine how the window moves and responds to the user dragging its title bar and resize button:
#define wimp_WINDOW_MOVEABLE                    ((wimp_window_flags) 0x2u)
#define wimp_WINDOW_NO_BOUNDS                   ((wimp_window_flags) 0x40u)
#define wimp_WINDOW_BOUNDED                     ((wimp_window_flags) 0x2000u)
#define wimp_WINDOW_IGNORE_XEXTENT              ((wimp_window_flags) 0x4000u)
#define wimp_WINDOW_IGNORE_YEXTENT              ((wimp_window_flags) 0x8000u)
A window can only be dragged around at all if the wimp_WINDOW_MOVEABLE flag is set; otherwise, it will be fixed at the place where the application last put it with Wimp_OpenWindow.
The wimp_WINDOW_NO_BOUNDS flag, if set, allows the window to move off the screen; however, even if it is not set, the user can force this setting for all windows on the desktop using the Allow windows off-screen to top and left and Allow windows off-screen to bottom and right options in the Windows section of Configure. These Configure options arrived in RISC OS 3 and, as a result, the wimp_WINDOW_BOUNDED flag was added to force a window to stay on screen. It’s generally best to leave wimp_WINDOW_NO_BOUNDS unset so that the user can make his or her own choice, and use wimp_WINDOW_BOUNDED if the window has to remain on screen.
The final two flags, wimp_WINDOW_IGNORE_XEXTENT and wimp_WINDOW_IGNORE_YEXTENT, control the behaviour of the mouse when the user tries to drag the window’s resize button. When set, the mouse can drag out away from the button when the window reaches full size. This isn’t desirable, and these flags should be left unset unless there’s some special code in place to spot this happening and change the size of the window’s work area – this is definitely ‘advanced’ behaviour, so for now assume that these flags should not be set!
Window behaviour flags
The final group of flags all relate in some way to the way that the window interacts with Wimp_Poll events:
#define wimp_WINDOW_AUTO_REDRAW                 ((wimp_window_flags) 0x10u)
#define wimp_WINDOW_PANE                        ((wimp_window_flags) 0x20u)
#define wimp_WINDOW_SCROLL_REPEAT               ((wimp_window_flags) 0x100u)
#define wimp_WINDOW_SCROLL                      ((wimp_window_flags) 0x200u)
#define wimp_WINDOW_HOT_KEYS                    ((wimp_window_flags) 0x1000u)

#define wimp_WINDOW_USE_EXTENDED_SCROLL_REQUEST ((wimp_extra_window_flags) 0x2u)
#define wimp_WINDOW_GIVE_SHADED_ICON_INFO       ((wimp_extra_window_flags) 0x10u)
If the wimp_WINDOW_AUTO_REDRAW flag is set, the Wimp won’t ask the application to help with redrawing the window. For all simple windows, this flag should be set: if it isn’t, then opening the window will lock the application (requiring Alt-Break to escape) unless there’s code in place to redraw the window. We’ll cover this, and the associated Wimp_Poll event, later.
Setting the wimp_WINDOW_HOT_KEYS flag will cause the window to receive details of unclaimed key presses even when it doesn’t have input focus: a concept that we will meet in Chapter 27. This often isn’t much use to an application, and will be left un-set for now – we will investigate further in Section 28.4.
The wimp_WINDOW_SCROLL and wimp_WINDOW_SCROLL_REPEAT flags, along with the wimp_WINDOW_USE_EXTENDED_SCROLL_REQUEST extended flag, control how the window responds to the user clicking on the arrows at the ends of its scroll bars. These can safely be left unset – at least until we’ve met the Wimp_Poll event associated with them!
On RISC OS 5, control over how the window responds to Interactive Help is provided by the wimp_WINDOW_GIVE_SHADED_ICON_INFO extended flag. This can be left unset until we come to implement interactive help support in our application.
Finally, from this group, is the wimp_WINDOW_PANE flag. This is intended for use by toolboxes and toolbars, such as the one found on Draw windows, but it actually does very little. It doesn’t help attach the window to its parent (the application itself must do that), but merely ensures that if the window gets input focus, then the title bar of the window below it in the window stack is highlighted.
The final flags relate to different window stacks. This is well outside the scope of most applications, and they can safely be left unset:
#define wimp_WINDOW_BACK                        ((wimp_window_flags) 0x800u)
#define wimp_WINDOW_FURNITURE_WINDOW            ((wimp_window_flags) 0x800000u)
#define wimp_WINDOW_FOREGROUND_WINDOW           ((wimp_window_flags) 0x800000u)
The window title and work area
The contents of the window’s title bar is set up in a couple of lines:
window_definition.title_flags = wimp_ICON_TEXT |
                wimp_ICON_BORDER | wimp_ICON_HCENTRED |
                wimp_ICON_VCENTRED | wimp_ICON_FILLED;
strncpy(window_definition.title_data.text, "Hello World!", 12);
The Wimp treats window title bars as though they are specialised icons with a limited set of options; we’ll come on to icons properly in Chapter 14, so for now we’ll just have to take on trust that the flags in window_definition.title_flags set up a text icon with its contents centred both vertically and horizontally. There’s a border drawn round it (the black outline), and it has a filled background.
With these title flags, the window_definition.title_data.text is a 12 byte field which can hold the text of the window title. The use of strncpy() with no attempt to terminate a buffer over-run might seem unusual, but in this case it’s exactly what is required. The Wimp allows for titles from zero to twelve characters in length and for text up to and including eleven characters, a zero terminator is required. When the text is exactly twelve characters long, however, no terminator should be used. It can feel very wrong for anyone used to always terminating copied strings, but for this specific task strncpy() on its own is the correct solution!
Once we’ve covered icons properly, we’ll revisit title bars properly in Section 15.8.
window_definition.work_flags = wimp_BUTTON_NEVER << wimp_ICON_BUTTON_TYPE_SHIFT;
The background of the window can respond to mouse clicks, and in a similar way to the title bar, the Wimp treats it as a kind of ‘pseudo-icon’ as far as configuring it is concerned. We’ll meet icon button types properly in Chapter 16, but for now the window_definition.work_flags can safely be set to wimp_BUTTON_NEVER.
window_definition.sprite_area = wimpspriteop_AREA;
If we’re using sprites in the window, we have the option of specifying a window_definition.sprite_area pointer to allow the Wimp to locate them for us. We’re not, so for now we can just set this to the default of wimpspriteop_AREA – we’ll look at this properly when we come to consider sprites in icons.
window_definition.icon_count = 0
The final item at the end of the definition is the window_definition.icon_count. We said earlier that the wimp_window structure was “at least 92 bytes long”: if the window contained any icons, they could be defined in an optional array at the end of the structure. We don’t have any icons yet, so the count is simply set to zero and the Wimp will then ignore the window_definition.icons[] array at the end of the wimp_window structure definition.