Chapter 1: An Example Application
Over the course of this tutorial, we’ll be looking at the different ways that panes can be used in RISC OS Wimp applications, and the code required to make them work. Since examples almost always make things easier to follow, we’ll start by creating a minimalist application containing the essentials required to get the windows and their panes on to the desktop. Although we will build up that code piece by piece in this chapter, the complete application will be available to download at the end – so don’t worry too much about copying the bits into a text editor as you go!
The language that we will be working in is BBC BASIC, although the concepts introduced should be easy enough to translate into other languages as required. The code will be self-contained, to avoid the distraction of using additional libraries, but I’ll be borrowing a number of the routines from my WimpLib BASIC Library to save re-inventing too many wheels along the way.
If you find it hard to follow any of the concepts in this chapter, it might be useful to look at a more general introduction to the Wimp first. There are a number of good books available for BASIC programmers, including A Beginner’s Guide To Wimp Programming or Wimp Programming For All, while those favouring C may wish to read my own Wimp Programming In C tutorial elsewhere on this site.
An application shell
To allow us to demonstrate panes, our application must be able to initialise itself, stay running while we examine what it does, and then exit on demand. A minimal structure for this can be seen in Listing 1.1.
TaskName$ = "PaneDemo"
TaskSprite$ = "application"

ON ERROR result% = FNwimperror_program : END

PROCinitialise

ON ERROR Quit% = FNwimperror_program

WHILE NOT Quit%
        PROCpoll
ENDWHILE

SYS "Wimp_CloseDown"
END
Listing 1.1: The application core
The code initialises a pair of global variables – TaskName$ and TaskSprite$ – which contain the application name and sprite necessary for the error handling. It then sets up a simple error handler, before calling PROCinitialise to get its interaction with the Wimp up and running.
If this goes OK, then the error hander is updated to be a little less drastic than the original one, before the code drops into the standard Wimp poll loop. Finally, when the Quit% variable becomes TRUE, indicating that the program should exit, it falls out of the WHILE loop and calls Wimp_CloseDown to tidy things up.
The initialisation is carried out by PROCinitialise, which can be seen in Listing 1.2.
DEF PROCinitialise
LOCAL buffer_size%

REM Set up the quit flag and global data blocks.

Quit% = FALSE

buffer_size% = 1024

DIM b% buffer_size% - 1, q% 255

REM Initialise with the Wimp.

SYS "Wimp_Initialise", 310, &4B534154, TaskName$, 0
ENDPROC
Listing 1.2: The Wimp initialisation code
For now, we do very little in the way of initialisation. The global variable Quit% is initialised to FALSE, to ensure that the appliction does not exit immediately, and a couple of buffers – pointed to by the variables b% and q% – are initialised to 1024 and 256 bytes respectively (remembering that in BASIC, DIM includes zero in its byte count). Whilst these will both be used as general purpose buffers, b% will be used as a store for loading template definitions and be passed as the event block to Wimp_Poll; q% will mostly be used as a second parameter block when calling other Wimp SWIs.
The program indicates that it knows about Wimp version 3.10 by passing 310 in R1 to Wimp_Initialise: whilst pane code will work on RISC OS 2, modern applications will usually aim for RISC OS 3.1 as a minimum, since a lot of now-standard functionality such was interactive help in menus as introduced at this point. The 310 means that Wimp_Initialise will expect to be passed a pointer to a zero-terminated list of user messages that the application requires in R3; we only care about Message_Quit, however, so we can simply pass 0 (a “null” pointer) to say “no other messages”.
Error handling is looked after by FNwimperror_program, which can be seen in Listing 1.3.
DEF FNwimperror_program
LOCAL result%
LOCAL ERROR

REM An error in the error hander will cause the application to print a brief
REM message out on screen, then exit immediately.

ON ERROR LOCAL VDU 4 : PRINT "Error in error handler (";REPORT$;"; error code ";ERL;")" : END

REM With the emergency error handler in place, now handle the original error.

SYS "Hourglass_Smash"

!q% = ERR
$(q% + 4) = TaskName$ + " has suffered an internal error (" + REPORT$ + "; error code " + STR$(ERL) + ")" + CHR$(0)
SYS "Wimp_ReportError", q%, &0703, TaskName$, TaskSprite$, 1, 0 TO ,result%

=(result% = 2)
Listing 1.3: The Wimp error handling code
In the event of an error, Hourglass_Smash is called to ensure that the hourglass is cleared, then Wimp_ReportError is used to report the problem to the user. Since this is called from ON ERROR, the expectation is that REPORT$ and ERL will have useful values. The user’s response to the error box is checked, and the function returns TRUE if it was Continue or FALSE if it was Cancel.
To be on the safe side, a local error hander is set up to catch any further errors and exit cleanly without going into an infinite loop. This is very much into “last resort” territory, so it just restores VDU 4 text output and writes to the screen. The original error handler, stacked by LOCAL ERROR, is restored when the function exits.
Finally, PROCpoll is called repeatedly to handle the calls to Wimp_Poll; the code can be seen in Listing 1.4.
DEF PROCpoll
LOCAL reason%

SYS "Wimp_Poll", &3C01, b% TO reason%

CASE reason% OF
  WHEN 17, 18 : IF b%!16 = 0 THEN Quit% = TRUE
ENDCASE
ENDPROC
Listing 1.4: The main Wimp Poll loop
For now, there’s not much here: we’re only interested in Message_Quit, which has the value of zero; if one of these messages arrives, we set the global Quit% variable to TRUE so that the program will terminate. This ensures that, in the absence of any other user interface, it can still be shut down from the Task Manager.
The BASIC program can be saved as !RunImage inside a !PaneDemo application folder, as seen in Figure 1.1.
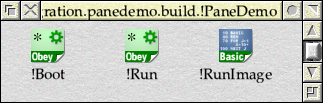
Figure 1.1: Our example application’s minimalist application folder
The !Boot file, shown in Listing 1.5, simply sets the application’s system variable.
If "<PaneDemo$Dir>"="" Then Set PaneDemo$Dir <Obey$Dir>
Listing 1.5: The !Boot file
The !Run file, in Listing 1.6, is similarly minimalist: setting the system variable, adjusting the wimpslot and launching the BASIC code.
Set PaneDemo$Dir <Obey$Dir>

WimpSlot -min 96K -max 96K
Run <PaneDemo$Dir>.!RunImage
Listing 1.6: The !Run file
If the application is run in this state, it will sit quietly in the background with no evidence of its existence aside from an entry in the Task Manager. To do something more interesting, we’ll need to add some more functionality!
An iconbar icon
It would be nice to give our application a presence on the iconbar, so that we can quickly open (and re-open) our window. To do this, we will add the code in Listing 1.7 to the end of PROCinitialise.
REM Create an iconbar icon.

PROCcreate_iconbar_icon(TaskSprite$)
Listing 1.7: Initialising the iconbar icon
It uses a PROCcreate_iconbar_icon procedure to do the hard work, which is defined in Listing 1.8.
DEF PROCcreate_iconbar_icon(sprite$)
q%!0 = -1
q%!4 = 0
q%!8 = 0
q%!12 = 68
q%!16 = 68
q%!20 = &3002
$(q% + 24) = sprite$
SYS "Wimp_CreateIcon",,q%
ENDPROC
Listing 1.8: Creating an iconbar icon
This procedure takes the name of the sprite to use in the icon as a parameter, then creates a standard iconbar icon, 68 × 68 OS Units in size, with that sprite and no text. For now, we won’t act on clicks made on the icon; this can be added when we have a window to open.
Adding some windows
Before we can add a pane to our application, we’ll need a window to which it can be attached. To this end, we will create a couple of windows in a templates file: a main window and, to prove that our pane handling code doesn’t adversely affect any other windows in the application, a standard program information window. These can be seen in Figure 1.2, being edited in the WinEd template editor. All of the examples in this tutorial will show WinEd, but if you have a different favourite editor, that will be fine to use as well.
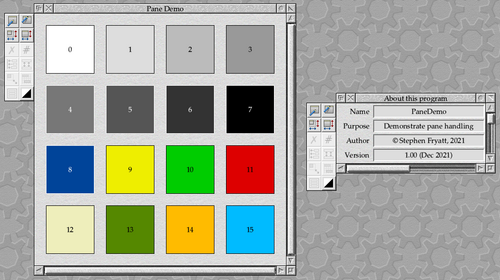
Figure 1.2: The two windows contained in our Templates file
The main window is a window with scroll bars, and some colourful icons in it so that any scroll offsets can be clearly seen. The program information window follows the standard RISC OS conventions. Both windows’ templates will fit comfortably into the 1024 bytes that we allocated to the load buffer in PROCinitialise. With the file saved as Templates inside !PaneDemo, our application folder should now look as seen in Figure 1.3.
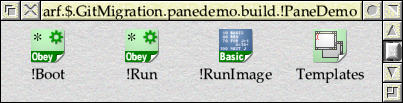
Figure 1.3: Our example application’s folder with templates added
To load the templates into our application, we can add some lines to PROCinitialise directly after the call to Wimp_Initialise. These can be seen in Listing 1.9.
REM Load the window templates

DIM TemplateName% 11

SYS "Wimp_OpenTemplate",,"<PaneDemo$Dir>.Templates"

PROCtemplate_load("Main", b%, buffer_size%, -1)
SYS "Wimp_CreateWindow",,b% TO MainWindow%
WindowWidth% = b%!8 - b%!0    : REM Width is Visible Area X1 - X0
WindowHeight% = b%!12 - b%!4  : REM Height is Visible Area Y1 - Y0

PROCtemplate_load("ProgInfo", b%, buffer_size%, -1)
SYS "Wimp_CreateWindow",,b% TO InfoWindow%

SYS "Wimp_CloseTemplate"
Listing 1.9: Initialising the window templates
The code opens the Templates file with Wimp_OpenTemplate, then loads the templates for the main window and program information window in turn. For each, a window is created immediately using Wimp_CreateWindow, with the handles being stored in the MainWindow% and InfoWindow% variables respectively. We also take the opportunity to calculate the width and height of the main window in OS Units, and store the values in the WindowWidth% and WindowHeight% variables for future reference.
The code uses PROCtemplate_load, which puts a friendly wrapping around the Wimp_LoadTemplate SWI and expects there to be a global TemplateName% variable pointing to a 12 character, word-aligned buffer for holding the template names. Its definition can be seen in Listing 1.10.
DEF PROCtemplate_load(name$, buffer%, size%, fonts%)
LOCAL templ_size%, indir_size%, workspace%

$TemplateName% = LEFT$(name$, 11)

REM Find the size required for the template and indirected data.

SYS "Wimp_LoadTemplate",,,,,-1, TemplateName%, 0 TO ,templ_size%, indir_size%

REM Return if the template won't fit in the buffer.

IF templ_size% > size% THEN ENDPROC

REM Claim the required indirection block.

DIM workspace% indir_size% - 1

REM Load the template into the buffer.

SYS "Wimp_LoadTemplate",,buffer%, workspace%, workspace% + indir_size%, fonts%, TemplateName%, 0
ENDPROC
Listing 1.10: Load a window template into memory
The procedure takes a pointer to the larger of the two buffers that we defined in PROCinitialise, then uses Wimp_LoadTemplate to find out how much space the template definition will take, and how much space it will require to store any indirected icon data. Assuming that the definition will fit into the supplied buffer, DIM is used to allocate the indirected icon storage, then Wimp_LoadTemplate is used again – this time to actually load the definition into memory.
With the windows loaded, we will need to add some code to open the main window when the user clicks on our iconbar icon. Opening the window is fairly simple, and can be done with the procedure shown in Listing 1.11.
DEF PROCopen_main_window
LOCAL screen_width%, screen_height%, window_width%, window_height%

REM Get the window details.

!q% = MainWindow%
SYS "Wimp_GetWindowState",,q%

REM If the window isn't open, resize and centre it on the screen.

IF (q%!32 AND &10000) = 0 THEN
  window_width% = WindowWidth%
  window_height% = WindowHeight%

  REM Read the screen dimensions.

  screen_width% = FNread_mode_dimension(11, 4)
  screen_height% = FNread_mode_dimension(12, 5)

  REM Ensure that the window fills no more than 75% of either dimension.

  IF window_width% > (screen_width% * 0.75) THEN window_width% = screen_width% * 0.75
  IF window_height% > (screen_height% * 0.75) THEN window_height% = screen_height% * 0.75

  REM Update the window dimensions.

  q%!4 = (screen_width% - window_width%) / 2    : REM Visible Area X0
  q%!8 = (screen_height% - window_height%) / 2  : REM Visible Area Y0

  q%!12 = q%!4 + window_width%                  : REM Visible Area X1
  q%!16 = q%!8 + window_height%                 : REM Visible Area Y1

  REM Reset the scroll offsets.

  q%!20 = 0                                     : REM X Scroll Offset
  q%!24 = 0                                     : REM Y Scroll Offset
ENDIF

REM Open the window at the top of the window stack.

q%!28 = -1 : REM Window to open behind (-1 is top of stack)

SYS "Wimp_OpenWindow",,q%
ENDPROC
Listing 1.11: Opening the main window
This follows the standard approach to opening a window: obtain the parameter block required by Wimp_OpenWindow with a call to Wimp_GetWindowState, then adjust the parameters as required.
If the window isn’t currently on screen – which we can tell by looking at the ‘window is open’ flag at bit 16 of the window flags stored at offset 32 into the returned parameter block – then we take the opportunity to adjust the window’s size and position so that its visible area is centred on the screen and as large as possible without filling more than three quarters of the display. The screen width and height are read using an FNread_mode_dimension function that we’ll define shortly, and this information is used to decide the maximum size that we wish the window to be. The window’s visible area coordinates (at offsets 4 to 16 in the block) are then updated to centre the window. If the window is already open, we leave the coordinates alone as we don’t want it to jump around or resize itself on screen. Finally, the scroll offsets – at offsets 20 and 24 into the block – are reset to zero so that the window appears fully scrolled to the top-left regardless of size.
The handle of the window to open behind (at offset 28 into the block) is set to −1, indicating “at the top of the stack”, and then the block is passed to Wimp_OpenWindow to perform the operation. Taken together, this will mean that if the user clicks on our iconbar icon and the window is not open, it will be opened in front of the other windows and centred on the screen. If the window is open, however, a click on the iconbar will simply bring it to the top of the stack in its current position.
The FNread_mode_dimension that is used to read the screen dimensions is defined in Listing 1.12.
DEF FNread_mode_dimension(pixelvar%, eigenvar%)
LOCAL flags%, eigenfactor%, pixels%

SYS "XOS_ReadModeVariable", -1, pixelvar% TO ,,pixels% ;flags%
IF flags% AND 2 THEN =-1

SYS "XOS_ReadModeVariable", -1, eigenvar% TO ,,eigenfactor% ;flags%
IF flags% AND 2 THEN =-1

=(pixels% + 1) << eigenfactor%
Listing 1.12: Reading the screen dmode dimensions
RISC OS stores the screen dimensions in two mode variables, which are the number of pixels counted from zero in that dimension, and the number of OS Units per pixel. The latter value is expressed in the form of a power of two, and is usually referred to in Acorn’s documentation as an eigenfactor. To get the number of OS Units in a dimension, we read both variables relating to it, adjust the pixel count up by one to account for the zero indexing, and shift the value left by the power of two representing the OS Unit scaling.
To make use of PROCopen_main_window, we can add a procedure to process Mouse_Click events as seen in Listing 1.13.
DEF PROCmouse_click(b%)
CASE b%!12 OF
WHEN -2 : REM Iconbar
  CASE b%!8 OF
  WHEN 4 : REM Select
    PROCopen_main_window
  ENDCASE
ENDCASE
ENDPROC
Listing 1.13: Process mouse click events
This takes a pointer to the Wimp_Poll event block and, when the window handle is the iconbar and the button is Adjust, calls PROCopen_main_window. Finally, we can add a new entry into the CASE statement in PROCpoll to call the code when a Mouse_Click event is received.
In order for our windows to work as expected, there are a couple of other events that we must handle: Open_Window_Request and Close_Window_Request. As their names suggest, these are sent to our task when one of its windows is to be opened (which includes every time that it changes position or size) or closed; without them, our windows can not be moved or closed. They can often seem fairly pointless in a simple application, but turn out to be essential for handling panes – as we’ll see over the coming chapters.
The complete event handling CASE statement in PROCpoll should now look as follows:
CASE reason% OF
  WHEN 2      : SYS "Wimp_OpenWindow",,b%
  WHEN 3      : SYS "Wimp_CloseWindow",,b%
  WHEN 6      : PROCmouse_click(b%)
  WHEN 17, 18 : IF b%!16 = 0 THEN Quit% = TRUE
ENDCASE
Adding a menu
The final piece of the jigsaw which it would be useful to add to our small application is an iconbar menu with a Quit entry, so that we can easily shut it down without having to delve into the Task Manager. We can also use it to access our program information window.
To construct the menu, we will add the lines in Listing 1.14 to PROCinitialise.
The code initialises a gobal variable named MenuOpen%, which is used to track the handle of the currently open menu. It then uses FNmenu_construct and PROCmenu_add_entry to build up the menu structure in memory. A pointer to the structure is stored in the IconbarMenu% variable, so the the menu can be accessed again later.
The memory for the menu is allocated using the general purpose FNmenu_construct, which is defined in Listing 1.15.
Taking the menu title and the number of entries that it will contain as parameters, the function calculates the size of block required (at 28 bytes plus an additional 24 for each entry), then uses DIM to allocate the required amount. In fact, we allocate one additional byte, for reasons which will become apparent when we start to add entries to the block.
The menu title is set up – using an indirected string, again allocated using DIM, if it contains more than twelve characters – and then the remainder of the menu header is filled in with the standard values. Finally each of the menu entries is initialised to be non-indirected, with an empty string and the default sets of flags. The final item has the menu flags set to &80 to indicate that it is the last, while after the loop has completed, the first item will have its menu flags updated to include &100 if the title was indirected.
With the structure set up, PROCmenu_add_entry, as defined in Listing 1.16, is used to fill in the entries.
This routine takes a pointer to the menu block to be updated and the index of the target entry, along with the menu item text and a submenu pointer (which can be zero if not required). It starts by finding the address of the entry within the block by stepping through the menu structure, checking the ‘last item’ flag bits as it goes. This way, there's no danger of inadvertently writing off the end of a menu block by getting entry numbers confused.
Once the entry has been found, the text is stored in a similar way to that used by FNmenu_construct for the menu title. If the text is twelve characters or less in length, then it is stored directly in the icon’s data; otherwise, an indirected buffer is claimed, the text is stored in that, then the icon is configured to use it. The reason that FNmenu_construct allocated an additional byte for the menu block lies here: if the final item’s text is twelve characters long, then the $ operator used to store the text will write its terminator into the byte immediately following the menu block!
With the item’s text stored, the menu’s width is updated to reflect it. This value is only used when the System Font is selected for the desktop, so the code assumes that characters are 16 OS Units wide for the purposes of the calculation. Finally, the submenu pointer is updated with the value supplied.
With the menu created, we need to be able to open it on screen – a task which is carried out by PROCmenu_create_iconbar in Listing 1.17.
The Style Guide dictates that iconbar menus are opened 64 OS Units to the left of the mouse position, with their base 96 OS Units from the bottom of the screen. To achieve this, we step through the menu entries adding up the heights of each entry and its associated gap, plus any separators that they have. At the end of this, we will have one gap too many, so one is removed. Finally, the address of the menu block is stored in the global MenuOpen% for future reference, and the menu is opened with a call to Wimp_CreateMenu.
This code needs to be called when the user clicks Menu on our iconbar icon, so we add a new entry to the CASE statements in PROCmouse_click to handle it:
CASE b%!12 OF
WHEN -2 : REM Iconbar
  CASE b%!8 OF
  WHEN 4 : REM Select
    PROCopen_main_window
  WHEN 2 : REM Menu
    PROCmenu_create_iconbar(IconbarMenu%, !b%)
  ENDCASE
ENDCASE
The final thing that we need to do is to handle Menu_Selection events, for which we will use PROCmenu_selection as seen in Listing 1.18.
As with our Mouse_Click event handler, this takes a pointer to the event block returned from Wimp_Poll. The list of menu selection indexes contained in the block is decoded using a CASE statement; if the Quit entry is selected, the Quit% variable is set to TRUE so that the application will exit.
Before any work is done, Wimp_GetPointerInfo is called to get the mouse state and determine whether an Adjust click was used, and hence whether the menu needs to be re-opened afterwards. It’s a bit moot if we only have the option of exiting the application, but even so, in the event that it was, Wimp_CreateMenu is called to restore the menu!
The final tweak is to add Menu_Selection events to the CASE statement in PROCpoll, which should now look as follows:
CASE reason% OF
  WHEN 2      : SYS "Wimp_OpenWindow",,b%
  WHEN 3      : SYS "Wimp_CloseWindow",,b%
  WHEN 6      : PROCmouse_click(b%)
  WHEN 9      : PROCmenu_selection(b%)
  WHEN 17, 18 : IF b%!16 = 0 THEN Quit% = TRUE
ENDCASE
A complete application
With that, we have a fully functional – if a little minimalist – application with which to experiment. The whole thing can be found in Download 1.1, and it can be seen running in Figure 1.4.
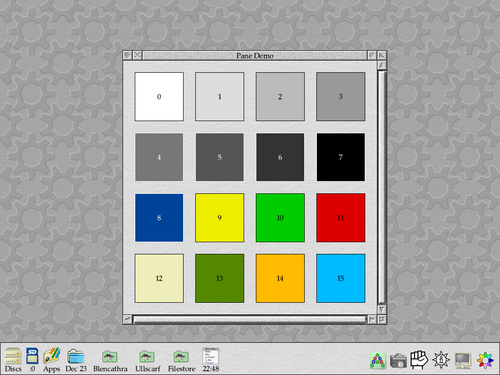
Figure 1.4: The complete example application, with no panes in sight
Over the coming chapters, we will be adapting the code to introduce and explore different aspects of handling panes within the RISC OS Wimp, so it would be a good idea to take the time now to ensure that you fully understand what all of the code is doing.