Chapter 4: Column Headings
Now that we have added both a toolbox and a toolbar to our example application in the past two chapters, it’s time to look a subtle way of altering the configuration a little more.
So far, both of our panes have used ‘fixed’ work areas which don’t scroll: their X and Y scroll offsets were set to zero in the window templates, and remained at that value as the main window moved around. However, there’s no reason why panes can’t scroll in sympathy with their parent windows: a spreadsheet might need to do this if it was using a pane to show the column headings in a document, for example. In fact Fireworkz, seen in Figure 4.1, does exactly this.
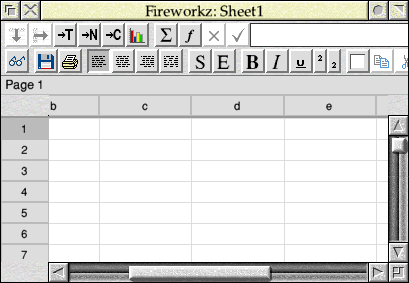
Figure 4.1: A spreadsheet like Fireworkz can use toolbars for column headings
It’s worth noting here that in the screenshot above, the Fireworkz window is actually composed of multiple panes. There’s a pane with a fixed work area containing the button and status bars (the latter containing the text “Page 1”), which – just like the one that we have already created – does not scroll with the work area. Below it is a separate pane containing just the column headings for the sheet (from “b” through to “e” here), which does scroll: ensuring that the headings remain lined up with the associated cells in the main window.
Although we won’t be assembling a composite set-up like Fireworkz, in this chapter, we’ll see what is required to make a pane scroll with its parent window.
Updating the templates
Following the now familiar pattern, we’ll begin by updating the window templates for our new example. As our code was starting to get a little unwieldy, we will begin by losing the toolbox to the left of the window, leaving just the toolbar at the top. The “Toolbox” template can therefore be deleted from the template file, leaving just the three templates for the main window, toolbar and program information window as seen in Figure 4.2.
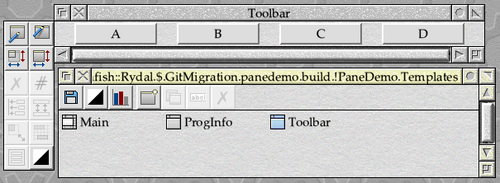
Figure 4.2: Adding the column headings to the toolbar in WinEd
The toolbar window itself has also been updated, removing the pair of action buttons and the writeable field. In their place are four ‘heading’ icons, which should line up with the columns of coloured squares in the main window. The buttons are now passive – neither visibly pressing nor generating Mouse_Click events – although as before this is merely cosmetic.
For the code itself, we have gone back to Download 3.2 and stripped out all of the code relating to the toolbox pane. First, we no longer need to load or create the window, reducing the template code in PROCinitialise to processing the remaining three windows as seen in Listing 4.1.
REM Load the window templates

DIM TemplateName% 11

SYS "Wimp_OpenTemplate",,"<PaneDemo$Dir>.Templates"

PROCtemplate_load("Main", b%, buffer_size%, -1)
SYS "Wimp_CreateWindow",,b% TO MainWindow%
WindowWidth% = b%!8 - b%!0    : REM Width is Visible Area X1 - X0
WindowHeight% = b%!12 - b%!4  : REM Height is Visible Area Y1 - Y0

PROCtemplate_load("Toolbar", b%, buffer_size%, -1)
SYS "Wimp_CreateWindow",,b% TO ToolBarWindow%

PROCtemplate_load("ProgInfo", b%, buffer_size%, -1)
SYS "Wimp_CreateWindow",,b% TO InfoWindow%

SYS "Wimp_CloseTemplate"
Listing 4.1: Loading the three window templates
Since there is no longer a toolbox to close when the main window closes, PROCclose_window_request can be reduced to the code shown in Listing 4.2.
DEF PROCclose_window_request(b%)
IF !b% = MainWindow% THEN
  !q% = ToolBarWindow%
  SYS "Wimp_CloseWindow",,q%
ENDIF

SYS "Wimp_CloseWindow",,b%
ENDPROC
Listing 4.2: Handling Close_Window_Request events for the main window
Finally, PROChandle_pane_windows can be simplified again; it is now as shown in Listing 4.3. There’s no longer any need to know the height of the toolbar, so PROCposition_toolbar has returned to the procedure originally seen in Listing 3.3.
DEF PROChandle_pane_windows(main%)
LOCAL toolbar%, top%, left%, right%

REM Get the Window State block for the toolbar pane, using some of the
REM spare space above the data for the state of the main window.
REM
REM Note: ON RISC OS 5, we could more clearly use DIM toolbox% LOCAL 64
REM here to allocate the required memory from the stack.

toolbar% = main% + 64

!toolbar% = ToolBarWindow%
SYS "Wimp_GetWindowState",,toolbar%

REM Move the toolbar pane so that it's in the correct X and Y position
REM relative to where the main window is to go.

PROCposition_toolbar(main%, toolbar%)

REM Unless the main window is to be opened behind the toolbar pane, meaning
REM that the pane must already be in the correct place in the stack, set the
REM pane's Open Behind so that it appears in the stack where the main window
REM is required to go. Then (re-)open the toolbar.

IF main%!28 <> ToolBarWindow% THEN toolbar%!28 = main%!28

SYS "Wimp_OpenWindow",,toolbar%

REM Set the main window's Open Behind so that it opens behind the toolbar.

main%!28 = ToolBarWindow%

REM (Re-)open the main window.

left% = main%!4
right% = main%!12
top% = main%!16

SYS "Wimp_OpenWindow",,main%

REM If the main window was moved on opening (perhaps if it opened off-screen),
REM re-position the toolbar against the new position and re-open it.

IF (main%!4 <> left%) OR (main%!12 <> right%) OR (main%!16 <> top%) THEN
  PROCposition_toolbar(main%, toolbar%)
  SYS "Wimp_OpenWindow",,toolbar%
ENDIF
ENDPROC
Listing 4.3: Opening the toolbar in the correct place
The code here should be comparable to that found in Download 2.1 – a single pane, but attached in a toolbar style instead of a toolbox. When run, the window should appear as seen in Figure 4.3, with the new column headings lining up with the coloured grid squares below.
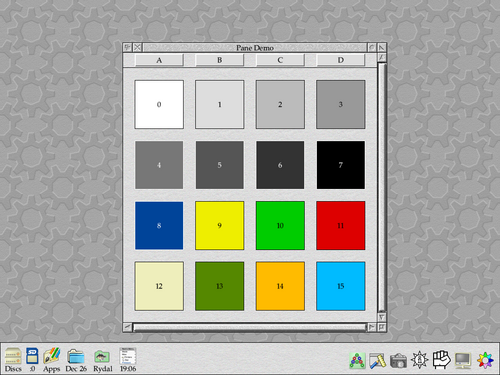
Figure 4.3: The example application with a column heading bar over the grid
The updated example code can be found in Download 4.1; it would be a good idea to check through it and ensure that you are comfortable with how relates to the earlier examples.
Out of alignment
Unfortunately, any satisfaction with our new example is likely to be short-lived. If the width of the main window is reduced, and then the horizontal scroll bar used to shift the work area, we can quickly see that things go out of alignment as shown in Figure 4.4. The main window’s work area moves with the scroll bars as expected, but the toolbar’s content remains where it was.
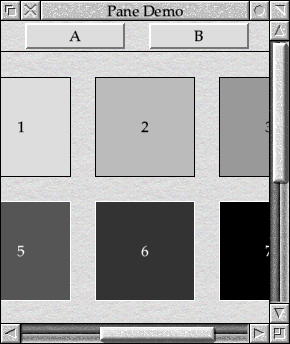
Figure 4.4: The column headings in the toolbar don’t stay aligned with the main window
The problem that we have is that moving the scroll bars alters the scroll offsets for the main window’s work area, but – as we noted above – the the scroll offsets for the work areas of our panes have always been left at zero. Up to now this has been the required behaviour, but this new example is calling for something different.
To keep the pane’s contents in alignment with that of the main window, we will need to ensure that its scroll offsets are updated correctly whenever we change its position in PROCposition_toolbar. We only want the pane to track the main window’s horizontal scrolling, so we can simply copy the X scroll offset from the main window block to the pane.
toolbar%!20 = main%!20 : REM X Scroll Offset
Things to consider here are that both the main window and the toolbar are the same width (we copy the X0 and X1 across unchanged as part of the pane positioning), and their horizontal extents are identical (both are set to 1040 OS Units in their window templates). As such, copying the X scroll offset across from one window to the other will have no unexpected effects.
If the pane were up the side of the window instead of across the top, and the vertical extents were the same, it would be possible to copy the vertical scroll offset (at offset 24 into the window state block) across to the pane instead. This might be useful for a pane containing row numbers, as seen in the Fireworkz window above, for example.
Putting the code together for the last time gives us Listing 4.4, showing PROCposition_toolbar copying the horizontal scroll offset over to the pane.
DEF PROCposition_toolbar(parent%, toolbar%)
LOCAL height%

REM Find the height of the toolbar pane's visible area.

height% = toolbar%!16 - toolbar%!8        : REM Visible Area Y1 - Y0

REM Move the toolbar pane so that it's in the correct X and Y position
REM relative to where the parent window is to go.

toolbar%!4 = parent%!4                    : REM Visible Area X0
toolbar%!8 = parent%!16 - height%         : REM Visible Area Y0
toolbar%!12 = parent%!12                  : REM Visible Area X1
toolbar%!16 = parent%!16                  : REM Visible Area Y1

REM Align the toolbar pane's scroll offset with the main window.

toolbar%!20 = parent%!20                  : REM X Scroll Offset
ENDPROC
Listing 4.4: Opening the toolbar in the correct place
Loading this version of the application, we can now scroll around the main window’s work area with the column headings in the toolbar remaining in step as seen in Figure 4.5.
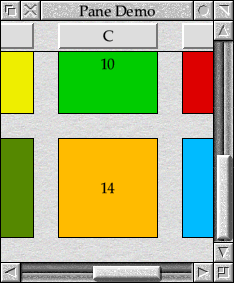
Figure 4.5: Scrolling horizontally with the scroll offsets held in step
The complete example code can be found in Download 4.2.
With this example, we have completed our look at how panes can be handed using nothing more than the standard Wimp to help us. However, in 1997 Acorn added a new system for controlling panes, known as the Nested Wimp. In the coming chapters, we will look at this in more detail and see how it compares to the original approach.