Chapter 5: Does Order Matter?
So far, we’ve seen how we can manually create one or more panes on our window, and have them behave in a number of distinct ways. Throughout the examples, however, the PROChandle_pane_windows procedure has always called Wimp_OpenWindow for the different windows in a very specific order: first the pane, then the main window, and finally the pane again.
Back in Section 2.6 we stated that this order was necessary, but hinted that we might be able to simplify things in certain circumstances. Now, with all of the main details covered, it seems like a good time to go back and fill in this missing information!
An optimisation?
If we go back to look at the code in Download 4.2 again, we can see that when an Open_Window_Request event arrives for the main window, it is treated as a special case by PROCopen_window_request.
DEF PROCopen_window_request(b%)
IF !b% = MainWindow% THEN
  PROChandle_pane_windows(b%)
ELSE
  SYS "Wimp_OpenWindow",,b%
ENDIF
ENDPROC
Instead of just calling Wimp_OpenWindow, control is immediately passed to the PROChandle_pane_windows procedure. This goes on to position and open the pane, then open the main window. Finally, it checks the position in which the main window opened, before re-opening the pane if it wasn’t in the expected place.
Given that we need to go back and adjust the position of the toolbox pane after the main window has been opened, it would seem that we could save some effort by only doing it once: after opening the main window. We could even streamline the code in PROCopen_window_request by always calling Wimp_OpenWindow for the target window, before calling PROChandle_pane_windows if the target is the main window. This alternative approach can be seen in Listing 5.1.
DEF PROCopen_window_request(b%)
SYS "Wimp_OpenWindow",,b%
IF !b% = MainWindow% THEN PROChandle_pane_windows(b%)
ENDPROC
Listing 5.1: An alternative way to handle Open Window Requests
By the time PROChandle_pane_windows is called, Wimp_OpenWindow will already have updated the window state block pointed to by main% with the coordinates of the actual visible area – we discussed why we can rely on this in Section 2.6. As a result, PROChandle_pane_windows can start by calling PROCposition_toolbar to update the visible area of the toolbox.
PROCposition_toolbar(main%, toolbar%)
In order to get the position in the stack correct, we can open the pane behind the same window that the main window has just been opened behind, which will have the effect of placing it in the required location directly in front of the main window.
toolbox%!28 = main%!28

SYS "Wimp_OpenWindow",,toolbox%
The full code for our new PROChandle_pane_windows can be seen in Listing 5.2, and it’s a lot simpler than the version that we had in Listing 2.8.
DEF PROChandle_pane_windows(main%)
LOCAL toolbar%

REM Get the Window State block for the toolbar pane, using some of the
REM spare space above the data for the state of the main window.
REM
REM Note: ON RISC OS 5, we could more clearly use DIM toolbox% LOCAL 64
REM here to allocate the required memory from the stack.

toolbar% = main% + 64

!toolbar% = ToolBarWindow%
SYS "Wimp_GetWindowState",,toolbar%

REM Move the toolbar pane so that it's in the correct X and Y position
REM relative to where the main window is to go.

PROCposition_toolbar(main%, toolbar%)

REM Open the toolbar pane behind the same window that the main window
REM was opened behind. This will place it directly in front of the
REM main window.

toolbar%!28 = main%!28

SYS "Wimp_OpenWindow",,toolbar%
ENDPROC
Listing 5.2: An alternative way to position the toolbox pane
Now that PROChandle_pane_windows doesn’t open the main window, we will also need to make a small change to PROCopen_main_window so that it also does that task for itself. The change is simply adding a call to Wimp_OpenWindow before the call to PROChandle_pane_windows, at the end of the procedure.
q%!28 = -1 : REM Window to open behind (-1 is top of stack)

SYS "Wimp_OpenWindow",,q%
PROChandle_pane_windows(q%)
With all of these changes in place, a complete copy of the new application can be found in Download 5.1. When run, it might perform in a very similar way to Download 4.2 from the previous chapter... or it might not.
Order does matter... sometimes
If you download and run Download 5.1, you will either find that it behaves identically to Download 4.2, or that it exhibits a very obvious flicker from the toolbar whenever the window is dragged around with Select on the title bar. Which it does will depend on the version of the Window Manager that you have present on your system.
To understand the differences, we’ll consider what happens to the main window and its toolbar pane when they’re dragged with Select at the top of the window stack. Figure 5.1 shows the initial positions of the two windows in the stack, at the point just before an Open_Window_Request event arrives to ask our application to open the main window at the top of the stack.
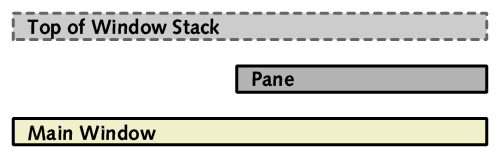
Figure 5.1: The initial window stack order
If we follow the new approach outlined in this chapter with Download 5.1, then the first thing that our application does is to call the PROCopen_window_request procedure, which in turn calls Wimp_OpenWindow for the main window using all of the values supplied by the Wimp. This will result in the main window being inserted at the top of the window stack as shown in Figure 5.2 – pushing the toolbar pane down below it.
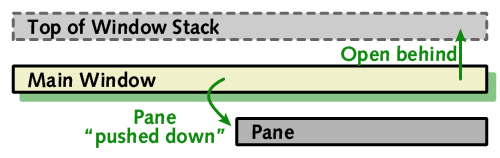
Figure 5.2: Opening the main window in the new approach
Since the event was for the main window, PROCopen_window_request goes on to call PROChandle_pane_windows, which positions the toolbar pane’s visible area correctly and then opens it behind the same window that the main window is behind: in this case, at the top of the window stack. This results in the toolbar pane being inserted back at the top of the stack as seen in Figure 5.3, pushing the main window down behind it again – back into its correct place.
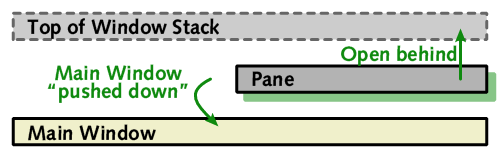
Figure 5.3: Opening the toolbar pane in the new approach
Compare this to the approach taken by Download 4.2 in Chapter 4. With the two windows once again starting in the relative positions shown in Figure 5.1, an Open_Window_Request event arrives for the main window. This time, however, PROCopen_window_request simply calls PROChandle_pane_windows without calling Wimp_OpenWindow for either window.
PROChandle_pane_windows begins by positioning the toolbar pane as best it can, then opens it in the position in the stack which was supplied by the Wimp for the main window. This results in the pane opening behind the window above the main window’s new position. In the case of a Select drag, this will leave the toolbar pane in front of the main window, as shown in Figure 5.4.
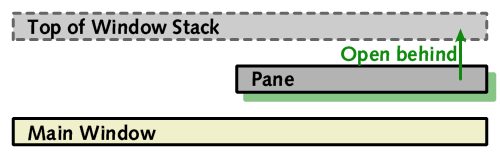
Figure 5.4: Opening the main window in the old approach
Once the toolbar pane has been opened, the main window’s position in the stack is adjusted to be behind the toolbar pane and it is then re-opened as well. This can be seen in Figure 5.5.
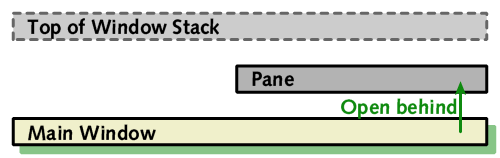
Figure 5.5: Opening the toolbar pane in the old approach
If the main window moved during opening, then the last thing that PROChandle_pane_windows will do is to re-position and re-open the toolbar pane – exactly as shown in Figure 5.4.
The difference between the two approaches can be seen in Figure 5.2 and Figure 5.4: in our new approach, the main window and its toolbar pane are very briefly swapped over during the opening sequence, whilst in our original code they are not.
A question of efficiency
The difference described in the previous section can matter a lot but, because of a small improvement introduced as part of the Nested Window Manager (or Nested Wimp), only with versions of the Window Manager prior to its release. A couple of the changes documented in the Nested Window Manager Functional Specification are “Redraw Optimisation” and improvements to the “Invalid Rectangle Handling”. Between them, these have a big impact on the handling of panes.
When an application calls Wimp_OpenWindow, the window in question isn’t immediately opened. Instead, the details are logged in a list of pending updates along with any other windows to be opened or closed – all of which are actioned after the application next calls Wimp_Poll. This means that when our application opens its main window and toolbar pane, both windows will be updated together after control has returned to the Wimp.
Prior to the Nested Wimp, all of these pending actions would be carried out in full, in the order that they were requested. In contrast, the Nested Wimp scans the whole list of requests and optimises out any inefficiencies, before carrying out the minimum number of actions actually required to achieve the end result.
What this means in practice is that the Nested Wimp will notice that, despite the toolbar pane ending up behind the main window in Figure 5.2, it ultimately ends up back in front in Figure 5.3. As a result, the Wimp will conclude that there’s no point redrawing the area of the main window which will be ending up behind the pane – even during the short period that it is on top – and so won’t ask for it to be done.
On earlier versions of the Wimp, however, our new optimised approach will result in the main window and its toolbar pane following the sequence shown in Figure 5.6 on every Open_Window_Request event. This produces a very visible flickering effect as each is redrawn in turn.
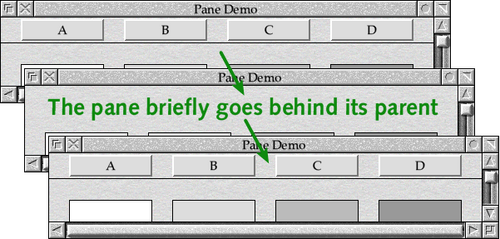
Figure 5.6: The main window and toolbar pane swapping over
Is it any use?
Given all of this, is the optimisation described in this chapter of any use? The answer is “yes,” but not in all circumstances.
If an application needs the Nested Wimp for some other reason, and will therefore not be able to run without it, then there’s no harm in relying on the redraw optimisation in order to simplify the pane handling code. However, it’s also worth remembering that the Nested Wimp will deal with many pane requirements – including those in this chapter – directly, with no need for any custom event handling; we’ll see how this works in the next chapter. The main thing that the Nested Wimp does not support is panes which fall outside the outline of the parent window, such as the side toolbox that we created in Chapter 2.
For applications which do not need the Nested Wimp for other reasons, and would otherwise work fine back to RISC OS 3 or earlier, it seems a shame to restrict their compatibility for no good reason. Save for the situation when the window first opens, the more compatible solution is no less efficient than this optimised one: they both call Wimp_OpenWindow once for the main window and once for each pane. The only real difference is in the complexity of the code itself, and how easy it is for developers to understand.
Which approach to use will be a decision for individual developers, based on their applications’s requirements. If you do use the optimisation, though, it’s a good idea to check for the presence of the Nested Wimp in the !Run of the application using an *RMEnsure.
RMEnsure WindowManager 3.80 Error PaneDemo requires the Nested Window Manager.
A version of the code with this change can be found in Download 5.2, and is the recommended way to approach this optimisation. There are no changes from Download 5.1 aside from the fact that it will politely refuse to start on a system without the Nested Wimp – preventing any unwanted behaviour from affecting the user.
Armed with the building blocks that we’ve met up to now, it should be possible to implement most panes in a way that will work on all versions of RISC OS. However, as hinted at above, if we’re happy to use the Nested Wimp – which isn’t unreasonable, given that it has been around for over twenty years now – then it can do a lot of the work for us... and more besides. In the next chapter, we’ll start to look at what is on offer.