Chapter 6: The Nested Wimp
Over the past few chapters, we have explored how to use pane windows to add toolboxes and toolbars to our small application. It has been a fairly manual process: setting the windows up and then keeping everything in step whenever things move on screen.
If we’re willing to forego compatibility back to RISC OS 2, then there is another way. The Nested Window Manager (or Nested Wimp, as we’ll call it from now on) was introduced by Acorn back in the late 1990s, as an add-on for the RiscPC-era systems. Intended to support things like web browsers with complex framesets and embedded objects, it is included as a standard part of the OS in RISC OS 4, 5 and Six. Documentation was initially provided in the Nested Window Manager Functional Specification, although these days many of the details can be found in the standard documentation.
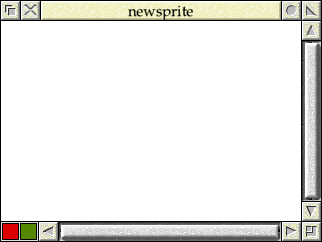
Figure 6.1: Amongst other things, the Nested Wimp can embed tools into scroll bars
The Nested Wimp’s headline feature is the ability to “nest” (or attach) child windows into a parent, very much as we have been doing with the toolbar in our example application. There are some disadvantages: it can’t support windows outside the frame of the parent window, so the side toolbox that we have previously created isn’t an option. On the positive side, it allows an application to do other more complex things like embed toolboxes into scroll bars, as seen in Figure 6.1 – previously something which required a lot of lateral thinking by an application developer.
Whether to use the Nested Wimp is going to be a decision for individual developers, but for modern software – albeit software which meets certain criteria – it makes a lot of sense. Use of the new functionality can significantly simply the handling of pane windows, as well as make available design options which were previously a lot of work to implement. Users who are installing new software are most likely to be the same users who have upgraded their OS to at least RISC OS 4.02, so the lack of support for RISC OS 3 may not be a big problem.
Re-creating our toolbar
To see how the Nested Wimp works, we will re-create our column-heading toolbar from the last chapter using parent and child windows instead of panes. In its previous incarnation of Download 4.2, which we will use as our base, it looked as seen in Figure 6.2.
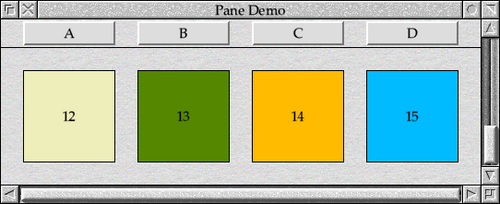
Figure 6.2: The toolbar that we’ll be re-creating
Starting with the Templates file, we will need to make a small change to the toolbar window. Moving to the Nested Wimp sees a change in terminology and approach: the toolbar is no longer a pane, but a child window, nested into the main or parent window. In practical terms, this means that we should no longer set the ‘window is a pane’ flag for the toolbar, as the reqired effects will instead be obtained when we nest it into the main window. In fact, leaving the ‘window is a pane’ flag set for child windows can cause the two approaches to clash – with some undesirable effects on the Wimp’s stability.
For this reason, we will untick Pane in the Toolbar window’s flags as seen in Figure 6.3. The Moveable flag remains unset, and there are no other changes to make.
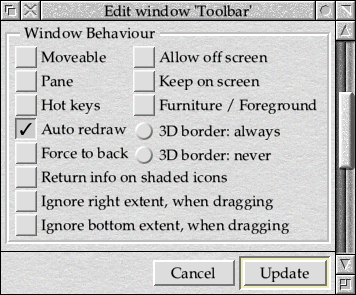
Figure 6.3: The toolbar no longer needs the pane flag set
The next thing that we will need to change is our application’s !Run file. Since we will be using the Nested Wimp, we need to check that it is actually present on the system before our application tries to start – which we do as seen in Listing 6.1.
Set PaneDemo$Dir <Obey$Dir>

RMEnsure WindowManager 3.80 Error PaneDemo requires the Nested Window Manager.

WimpSlot -min 96K -max 96K
Run <PaneDemo$Dir>.!RunImage
Listing 6.1: The !Run file must test for the Nested Wimp
Since the Window Manager can’t be replaced whilst the system is running, all that we can do is test for it and refuse to start if it isn’t present. If this happens, the user will need to install an update in !Boot – although as already noted, a suitable version of the Window Manager is present in ROM with RISC OS 4, 5 and Six.
We will also need to update our call to Wimp_Initialise in PROCinitialise. Instead of passing 310 in R0 to indicate that we wish to use the features of RISC OS 3.1, we must now pass 380 as shown in Listing 6.2, to tell the Wimp that we want its nested functionality to be available to us.
SYS "Wimp_Initialise", 380, &4B534154, TaskName$, 0
Listing 6.2: Initialising for the Nested Wimp
The big change between the two examples will be in how the toolbar pane is handled. Up to now, we have had to position our panes when the main window is initially opened, and then keep them up to date on every single Open_Window_Request event after that; we also need to remember to close them on the Close_Window_Request event. With the Nested Wimp we still need to position our panes when the window is initially opened, but when we do, we also let the Wimp know that they are attached to the main window – and more crucially, how they are attached.
After that, with the main window and its toolbar open on screen, the Wimp deals with all of the positioning work that we have so far done by hand. This means that we can delete both PROCopen_window_request and PROCclose_window_request, because we no longer need to do any special work on Open_Window_Request or Close_Window_Request events. Instead, we can just pass them to the Wimp_OpenWindow and Wimp_CloseWindow SWIs respectively, as we did before we added any panes to our application. As a result, PROCpoll can return to how it was in Chapter 1, as seen in Listing 6.3.
DEF PROCpoll
LOCAL reason%

SYS "Wimp_Poll", &3C01, b% TO reason%

CASE reason% OF
        WHEN 2          : SYS "Wimp_OpenWindow",,b%
        WHEN 3          : SYS "Wimp_CloseWindow",,b%
        WHEN 6          : PROCmouse_click(b%)
        WHEN 9          : PROCmenu_selection(b%)
        WHEN 17, 18     : IF b%!16 = 0 THEN Quit% = TRUE
ENDCASE
ENDPROC
Listing 6.3: Our Wimp_Poll loop has become simpler again
Opening windows
Opening the main window and its pane in PROCopen_main_window follows a familiar pattern. We start by setting up a couple of variables, main% and toolbar%, to point to blocks of memory in which to store window state blocks for the two windows; as before, we’re putting them both into the 256 byte buffer pointed to by q% to avoid having to dynamically allocate any memory.
main% = q%
toolbar% = q% + 64
We use Wimp_GetWindowState to request details of the main window, then reposition it as required ready for a call to Wimp_OpenWindow. Aside from the last SWI call, this code is exactly the same as that used in PROCopen_main_window.
REM Get the main window details.

!main% = MainWindow%
SYS "Wimp_GetWindowState",,main%

REM If the window isn't open, resize and centre it on the screen.

IF (main%!32 AND &10000) = 0 THEN
  window_width% = WindowWidth%
  window_height% = WindowHeight%

  REM Read the screen dimensions.

  screen_width% = FNread_mode_dimension(11, 4)
  screen_height% = FNread_mode_dimension(12, 5)

  REM Ensure that the window fills no more than 75% of either dimension.

  IF window_width% > (screen_width% * 0.75) THEN window_width% = screen_width% * 0.75
  IF window_height% > (screen_height% * 0.75) THEN window_height% = screen_height% * 0.75

  REM Update the window dimensions.

  main%!4 = (screen_width% - window_width%) / 2   : REM Visible Area X0
  main%!8 = (screen_height% - window_height%) / 2 : REM Visible Area Y0

  main%!12 = main%!4 + window_width%              : REM Visible Area X1
  main%!16 = main%!8 + window_height%             : REM Visible Area Y1

  REM Reset the scroll offsets.

  main%!20 = 0                                    : REM X Scroll Offset
  main%!24 = 0                                    : REM Y Scroll Offset
ENDIF

REM Open the window at the top of the window stack.

main%!28 = -1 : REM Window to open behind (-1 is top of stack)
The first difference from our previous examples comes with the call to Wimp_OpenWindow – instead of simply passing a pointer to the main window’s state block in R1, we will use the so-called “extended syntax” of the SWI.
SYS "Wimp_OpenWindow",,main%, &4B534154, -1, &0
This extended form still takes a pointer to the window state block, but now R2 contains the familiar Wimp magic constant of &4B534154 – or ‘TASK’ in ASCII. If present, this unlocks more functionality from the call: R3 will then take the handle of this window’s parent window, while R4 takes the nesting flags.
For the main window, we supply a parent window handle of −1 to indicate that it will be a top level window – that it is not to be treated as being nested within any other window. This makes it exactly the same as a window opened using the conventional version of the SWI. None of the nesting flags apply, so they are set to &0.
Previously, having called Wimp_OpenWindow for the main window, we would go on to call PROChandle_pane_windows to set up and open the toolbar pane. Since positioning the windows is a one-off operation with the Nested Wimp, however, we will bring the code into PROCopen_main_window. Most of the code is identical to that which we have used before: getting the toolbar pane’s details with Wimp_GetWindowState, then adjusting the position to suit the location of the main window.
REM Get the toolbar details

!toolbar% = ToolBarWindow%
SYS "Wimp_GetWindowState",,toolbar%

REM Find the height of the toolbar pane's visible area.

bar_height% = toolbar%!16 - toolbar%!8            : REM Visible Area Y1 - Y0

REM Move the toolbar pane so that it's in the correct X and Y position
REM relative to where the main window is to go.

toolbar%!4 = main%!4                              : REM Visible Area X0
toolbar%!8 = main%!16 - bar_height%               : REM Visible Area Y0
toolbar%!12 = main%!12                            : REM Visible Area X1
toolbar%!16 = main%!16                            : REM Visible Area Y1

REM Align the toolbar pane's horizontal scroll offset with the main window.

toolbar%!20 = main%!20                            : REM X Scroll Offset

REM Open the toolbox pane at the top of the stack, nested into the main window.

toolbar%!28 = -1
The magic of the Nested Wimp comes in the last line of the procedure, however: the call to Wimp_OpenWindow which opens the toolbar pane. Once again, we will be using the extended version of the SWI.
SYS "Wimp_OpenWindow",,toolbar%, &4B534154, !main%, &08A90000
Nesting windows
Unlike the main window, which we opened as a top level window, we want the Wimp to treat the toolbar window as being nested within the main window. To achieve this, we pass the handle of the main window (the toolbar’s parent window) in R3 when calling Wimp_OpenWindow for the pane. We will also need to let the Wimp know how the two windows are joined together, and the nesting flags in R4 do that.
The flags are a 32-bit value, defined in Table 6.1; the bits which are not listed (1 to 15, 28 to 31) are reserved and should be zero.
| Bits | Purpose |
|---|---|
| 0 | Update the window flags using the flags at offset 32 into the window state block pointed to by R1 |
| 16 & 17 | Anchor point for the left (X0) edge of the child |
| 18 & 19 | Anchor point for the bottom (Y0) edge of the child |
| 20 & 21 | Anchor point for the right (X1) edge of the child |
| 22 & 23 | Anchor point for the top (Y1) edge of the child |
| 24 & 25 | Anchor point for the X scroll offset of the child |
| 26 & 27 | Anchor point for the Y scroll offset of the child |
Table 6.1: The Nesting Flags for Wimp_OpenWindow
Bit 0 is interesting in itself, as for the first time it makes it possible to change the window flags of a window after it has been created. Previously, doing things like changing the window furniture (scroll bars, back icons, and so on) required a window to be deleted with Wimp_DeleteWindow and then re-created with the new flags. Now, with the Nested Wimp, an application can simply put the desired new values into the correct place within the block passed to Wimp_OpenWindow, and set this bit of the nesting flags.
However, this is beside the point: what we’re interested in at present are the anchor points between bit 16 and bit 27. These define how a child window is attached to its parent; in our case, how our toolbar will be attached to the main window. Each of the anchor points is given by a two-bit value, with the possible meanings listed in Table 6.2.
| Setting | Meaning |
|---|---|
| %00 | Link to the work area of the parent |
| %01 | Link to the left or bottom (X0 or Y0) of the parent’s visible area |
| %10 | Link to the right or top (X1 or Y1) of the parent’s visible area |
| %11 | Reserved – do not use |
Table 6.2: The Nesting Values for Wimp_OpenWindow
There’s a lot of information required here, but it can be broken down fairly logically – and we have already worked out all of the answers that we will need. If we look back at how we set up the toolbar’s visible area, we see that the four coordinates were copied across from the main window’s visible area as follows.
toolbar%!4 = main%!4                : REM Visible Area X0
toolbar%!8 = main%!16 - bar_height% : REM Visible Area Y0
toolbar%!12 = main%!12              : REM Visible Area X1
toolbar%!16 = main%!16              : REM Visible Area Y1
These four values correspond to the first four anchor points in the nesting flags, and we can draw the parallels in Table 6.3.
| Point | Written To | Copied From | Anchored To |
|---|---|---|---|
| Left Edge (X0) | toolbar%!4 | main%!4 | Visible Area X0 |
| Bottom Edge (Y0) | toolbar%!8 | main%!16 - bar_height% | Visible Area Y1 |
| Right Edge (X1) | toolbar%!12 | main%!12 | Visible Area X1 |
| Top Edge (X1) | toolbar%!16 | main%!16 | Visible Area Y1 |
Table 6.3: Assigning the nesting flags
As can be seen from the first two columns, the anchor points in the nesting flags directly correspond to the four visible area coordinates stored at offsets 4 to 16 of the pane’s window state block. In each case, when setting up the pane’s visible area, we assign a value based on one of the visible area coordinates in the main window’s state block, as shown in column three. This is the key to working out the anchoring: if we look at the value which we assign in each case, it will tell us where we have anchored that side of the pane window.
Take the visible area X0 value at toolbox%!4, for example: we copy this from main%!4, which is the visible area X0 of the main window. This tells us that the visible area X0 of the pane (the left edge of the child window) is attached to the visible area X0 of the main window. If we look at the options in Table 6.2, we can see this gives us a flag value of %01 – “Link to the left or bottom (X0 or Y0) of the parent’s visible area”.
Similarly, the visible area X1 value at toolbox%!12 is being copied from main%!12, which is the visible area X1 of the main window. From this, we can tell that the right edge of the pane will be attached to the visible area X1 of the main window, giving us a value of %10 – “Link to the right or top (X1 or Y1) of the parent’s visible area” – from Table 6.2.
For the visible area Y0 value at toolbox%!8, we assign main%!16 - bar_height%; this is referencing main!%16, or the visible area Y1 of the main window. The visible area Y1 at toolbar%!16 is assigned main%!16, which is again the visible area Y1 of the main window. Consequently, we can tell that both the bottom and top edges of the pane will use values of %10 – “Link to the right or top (X1 or Y1) of the parent’s visible area” – from Table 6.2.
The way that the toolbar is anchored into the main window is summarised in Figure 6.4.
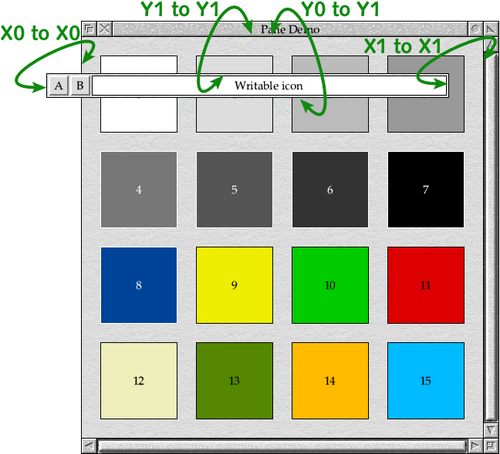
Figure 6.4: Anchoring the toolbar to the main window
Working out the anchor points for the X and Y scroll offsets is a little different, but follows similar logic. Looking at our pane positioning code again, we can see that we assign the toolbar’s scroll offsets as follows.
toolbar%!20 = main%!20 : REM X Scroll Offset
We copy the horizontal scroll offset from the main window, because we want the column headings in the toolbar to line up with the columns in the main window. In previous examples, we would copy this value across on every Open_Window_Request event and now we want the Nested Wimp to keep the horizontal scroll offsets of the two windows in step. Consequently we want the horizontal scroll offset of the toolbar to be linked ”to the work area of the parent” which is %00 from Table 6.2.
In contrast, we never change the vertical scroll offset. To make sure that the Nested Wimp doesn’t either, we link it to the same part of the window as the visible area Y1 value: %10 – “Link to the right or top (X1 or Y1) of the parent’s visible area” – from Table 6.2.
Putting these values together gives us %00 00 10 00 10 10 10 01 for the top 16 bits of the nesting flags, or &08A9 in hex. The bottom 16 bits are all clear, since we don’t wish to have Wimp_OpenWindow updating the window flags, which gives a complete value of &08A90000 for the nesting flags. Figure 6.5 shows how the value is assembled.
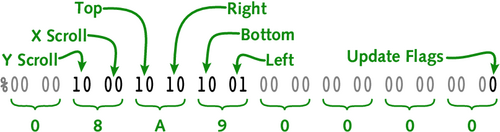
Figure 6.5: Assembling the nesting flags
A complete application
Putting it all together, we can delete PROChandle_pane_windows; all of the functionality is now in the new PROCopen_main_window, in Listing 6.4.
DEF PROCopen_main_window
LOCAL screen_width%, screen_height%, window_width%, window_height%, main%, toolbar%, bar_height%

REM Set up the memory blocks.

main% = q%
toolbar% = q% + 64

REM Get the main window details.

!main% = MainWindow%
SYS "Wimp_GetWindowState",,main%

REM If the window isn't open, resize and centre it on the screen.

IF (main%!32 AND &10000) = 0 THEN
  window_width% = WindowWidth%
  window_height% = WindowHeight%

  REM Read the screen dimensions.

  screen_width% = FNread_mode_dimension(11, 4)
  screen_height% = FNread_mode_dimension(12, 5)

  REM Ensure that the window fills no more than 75% of either dimension.

  IF window_width% > (screen_width% * 0.75) THEN window_width% = screen_width% * 0.75
  IF window_height% > (screen_height% * 0.75) THEN window_height% = screen_height% * 0.75

  REM Update the window dimensions.

  main%!4 = (screen_width% - window_width%) / 2   : REM Visible Area X0
  main%!8 = (screen_height% - window_height%) / 2 : REM Visible Area Y0

  main%!12 = main%!4 + window_width%              : REM Visible Area X1
  main%!16 = main%!8 + window_height%             : REM Visible Area Y1

  REM Reset the scroll offsets.

  main%!20 = 0                                    : REM X Scroll Offset
  main%!24 = 0                                    : REM Y Scroll Offset
ENDIF

REM Open the window at the top of the window stack.

main%!28 = -1 : REM Window to open behind (-1 is top of stack)

SYS "Wimp_OpenWindow",,main%, &4B534154, -1, &0

REM Get the toolbar details

!toolbar% = ToolBarWindow%
SYS "Wimp_GetWindowState",,toolbar%

REM Find the height of the toolbar pane's visible area.

bar_height% = toolbar%!16 - toolbar%!8            : REM Visible Area Y1 - Y0

REM Move the toolbar pane so that it's in the correct X and Y position
REM relative to where the main window is to go.

toolbar%!4 = main%!4                              : REM Visible Area X0
toolbar%!8 = main%!16 - bar_height%               : REM Visible Area Y0
toolbar%!12 = main%!12                            : REM Visible Area X1
toolbar%!16 = main%!16                            : REM Visible Area Y1

REM Align the toolbar pane's scroll offset with the main window.

toolbar%!20 = main%!20                            : REM X Scroll Offset

REM Open the toolbox pane at the top of the stack, nested into the main window.

toolbar%!28 = -1

SYS "Wimp_OpenWindow",,toolbar%, &4B534154, !main%, &08A90000
ENDPROC
Listing 6.4: Opening the nested windows
Running our new application should give us the window seen in Figure 6.6 – indistinguishable, from a user’s point of view at least, from the version that we built in the previous chapter.
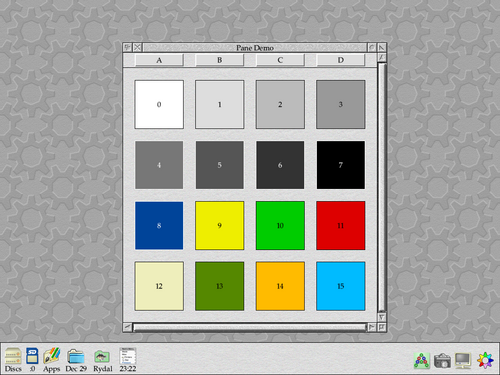
Figure 6.6: The column headings toolbar, handled by the Nested Wimp
Reducing the size of the main window and adjusting the scroll bars should reveal that the column headings in the toolbar correctly follow the main window contents, just as they did in our manually-managed bar. Whilst we might not have reduced the total amount of code by much, we have reduced the complexity of our Open_Window_Request and Close_Window_Request event handlers significantly. We have also passed all responsibility for keeping our window and its toolbar together to the Wimp.
The complete application can be found in Download 6.1.
In addition to recreating the column headings, we can also implement the toolbar from Chapter 3 using the Nested Wimp. In next chapter, we will look at this in more detail.