Chapter 7: Responsive Nesting
In the previous chapter we used the Nested Wimp to re-create the column heading toolbar from Chapter 4. If we wanted to use it to implement the fixed ‘URL bar’ from Chapter 3 with the Nested Wimp, how would we go about modifying the code to achieve it?
We can see the layout that we’re after in Figure 7.1, although this time around we won’t be including the toolbox on the left hand side because – as we’ve previously noted – the Nested Wimp will only support child windows which are completeley within the frame of their parent. It’s very similar to the column heading bar, so we should be able to re-use a lot of the code from Download 6.1.
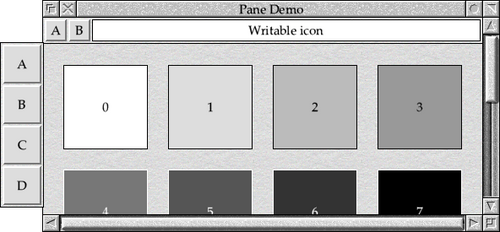
Figure 7.1: The toolbar to be re-created.
A fixed toolbar
The first thing to do is to fetch the old toolbar template from Chapter 4, returning to the bar with two action buttons and a writeable icon. As with the column heading bar in the previous chapter, we will need to unset the ‘window is a pane’ flag, but otherwise the template is unchanged.
The only difference between this toolbar and the one from the previous chapter is that this toolbar retains a horizontal scroll offset of zero at all time, while that one tracked the work area of the parent window. If we look back at the changes required in Section 4.3 to make the toolbar’s work area follow the work area of the main window, we can see that it was simply a case of adding a single line to keep the horizontal scroll offsets in step.
toolbar%!20 = main%!20 : REM X Scroll Offset
When we created our new PROCopen_main_window in the previous chapter, we included a similar line to ensure that the horizontal scroll offsets were in step before the windows were nested together, and we can remove this to allow the toolbar to retain the offset defined in the template file.
With the Nested Wimp there’s one more change that needs to be made, however. In the nesting flags supplied when calling Wimp_OpenWindow for the toolbar, we had previously set the anchor point for the X scroll offset to %00 – for “link to the work area of the parent”. However, we no longer want the bar to scroll with the main window.
Instead, we should set the horizontal scroll anchor to %01, for “link to the left or bottom (X0 or Y0) of the parent’s visible area”. This will ensure that the left-hand end of the bar, where the two action buttons are, will remain visible as the main window changes shape.
The updated part of PROCopen_main_window to handle the opening of the toolbar pane can be seen in Listing 7.1.
REM Get the toolbar details

!toolbar% = ToolBarWindow%
SYS "Wimp_GetWindowState",,toolbar%

REM Find the height of the toolbar pane's visible area.

bar_height% = toolbar%!16 - toolbar%!8            : REM Visible Area Y1 - Y0

REM Move the toolbar pane so that it's in the correct X and Y position
REM relative to where the main window is to go.

toolbar%!4 = main%!4                              : REM Visible Area X0
toolbar%!8 = main%!16 - bar_height%               : REM Visible Area Y0
toolbar%!12 = main%!12                            : REM Visible Area X1
toolbar%!16 = main%!16                            : REM Visible Area Y1

REM Open the toolbox pane at the top of the stack, nested into the main window.

toolbar%!28 = -1

SYS "Wimp_OpenWindow",,toolbar%, &4B534154, !main%, &09A90000
Listing 7.1: Opening the toolbar with a fixed scroll offset
When run, the application should look as seen in Figure 7.2 – again, indistinguishable from the one that we built in Chapter 3 from a user’s perspective.
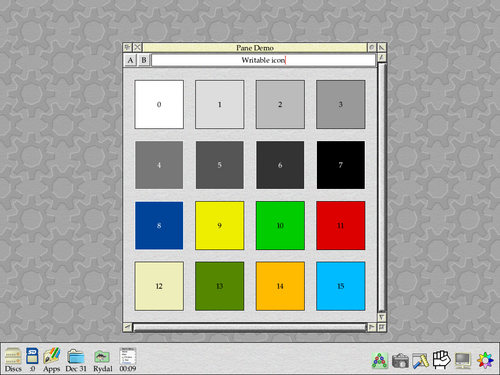
Figure 7.2: The toolbar, handled by the Nested Wimp
The complete application can be found in Download 7.1.
Catching events
There’s one nicety missing from this version of the toolbar, however. Back in Section 3.7 we had arranged for the writeable icon to be cropped to fill the width of the toolbar, which gave a better visual appearance and ensured that the text was always visible. If we could implement that again, then it would make this Nested Wimp version complete.
Fortunately, it’s a similar process with the Nested Wimp as it was when we were doing things manually – although there is one optimisation that we can make this time around. Last time, we checked for the presence of the Wimp_ResizeIcon SWI when the application initialised, and omitted the resizing on systems where it wasn’t available. Since this time we know that we’re using the Nested Wimp, because we test for it in the !Run file, we also know that the SWI we need will be present – and so we can safely use it without any further checks.
The actual process of moving the icon as the toolbar grows and shrinks is very similar under the Nested Wimp to how it was when we were handling the panes manually. We simply look out for Open_Window_Request events for the toolbar, and adjust the icon once we know the new position of its parent window. To this end, we will start by reinstating a call to PROCopen_window_request in our Wimp_Poll routine from PROCpoll.
CASE reason% OF
  WHEN 2      : PROCopen_window_request(b%)
  WHEN 3      : SYS "Wimp_CloseWindow",,b%
  WHEN 6      : PROCmouse_click(b%)
  WHEN 9      : PROCmenu_selection(b%)
  WHEN 17, 18 : IF b%!16 = 0 THEN Quit% = TRUE
ENDCASE
The new PROCopen_window_request will be defined as shown in Listing 7.2. We still call Wimp_OpenWindow to let the Wimp handle the opening of the window for us, but if the window in question is the main window, then we will call PROCadjust_toolbar_content to perform the toolbar icon updates.
DEF PROCopen_window_request(b%)
SYS "Wimp_OpenWindow",,b%
IF !b% = MainWindow% THEN PROCadjust_toolbar_content
ENDPROC
Listing 7.2: The new Open Window Request event handler
There are a couple of things to note here. First, we test for the window handle being equal to MainWindow% and not ToolBarWindow%. The Nested Wimp treats all child windows as being part of their parent, so we will never see any events for the toolbar itself – instead, we must look out for the main window being opened, and perform any operations on its child windows at this point. In many ways, this is similar to the way that we were handling the toolbar manually.
The second point is that we call PROCadjust_toolbar_content after calling Wimp_OpenWindow. When the SWI has returned, the Wimp will have updated the parent window and all of its children to their new positions – at least within its data structures, if not on screen. This means that we are safe to query the position of any of the windows using the usual Wimp SWIs.
We will also need to adjust the position of the icon when the window is first opened, so a call to PROCadjust_toolbar_content is added after the call to Wimp_OpenWindow in PROCopen_main_window.
SYS "Wimp_OpenWindow",,toolbar%, &4B534154, !main%, &09A90000
PROCadjust_toolbar_content
Finally, PROCadjust_toolbar_content is defined as shown in Listing 7.3.
DEF PROCadjust_toolbar_content
LOCAL icon%, bar_rhs%

toolbar% = q%
icon% = q% + 64

toolbar%!0 = ToolBarWindow%
SYS "Wimp_GetWindowState",,toolbar%

icon%!0 = ToolBarWindow%
icon%!4 = 0 : REM Writeable Icon Handle
SYS "Wimp_GetIconState",,icon%

bar_rhs% = (toolbar%!12 - toolbar%!4) + toolbar%!20 : REM Visible Area (X1 - X0) + X Scroll Offset

SYS "Wimp_ResizeIcon", icon%!0, icon%!4, icon%!8, icon%!12, bar_rhs% - 4, icon%!20
SYS "Wimp_ForceRedraw", ToolBarWindow%, icon%!8, icon%!12, bar_rhs%, icon%!20

SYS "Wimp_GetCaretPosition",,icon%
IF icon%!0 = ToolBarWindow% AND icon%!4 = 0 THEN SYS "Wimp_SetCaretPosition", icon%!0, icon%!4,,,icon%!16, icon%!20
ENDPROC
Listing 7.3: Adjusting the toolbar icon position
This is very similar to the code in Listing 3.9, as described in Section 3.7. The main difference is that we need to find the new position of the toolbar window by calling Wimp_GetWindowState – which we can do, because the call to Wimp_OpenWindow has already been made.
After we have that information, we can read the icon position as we did before using Wimp_GetIconState, calculate its new position and call Wimp_ResizeIcon to update it. A call to Wimp_ForceRedraw ensures that any affected areas of the screen are redrawn, while Wimp_SetCaretPosition is used to ensure that the caret is still in a valid place within the text. For more details of this process, see Section 3.7.
Running the application now will produce the same window as before. If it is resized to reduce the width of the toolbar, however, then we will see that the writeable icon is cropped to fit the space available once more as seen in Figure 7.3.
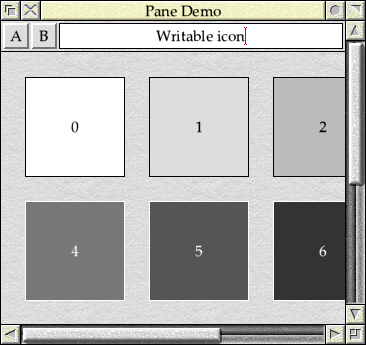
Figure 7.3: Resizing the writeable icon to fit the toolbar
The complete application can be found in Download 7.2.
So far, we have used the Nested Wimp to recreate the same toolbars that we were able to produce by hand using older versions of the Wimp. It has more interesting tricks up its sleeve, however, and we will start to look at these in the next chapter.