Chapter 8: Moving the Furniture
In the last chapter, we saw how the Nested Wimp can be used to look after a pane within our application’s window. Whilst useful, however, this is no more than we can do easily by hand – as we’ve already shown in the chapters before it.
Those familiar with RISC OS will know that some applications handle their toolbars slightly differently, however. NetSurf is one such application, as seen in Figure 8.1, and we saw a much more elaborate example with Fireworkz back in Figure 4.1.

Figure 8.1: NetSurf’s toolbar spans the whole width of the window frame
Look closely at NetSurf’s main browser window, and we can see that the toolbar extends across the full width of the window outline: on the right hand side, it even pushes the scroll bar down to make space for it. This can be done manually as well, by building a composite window consisting of many different panes in the way that Fireworkz does. If you have access to a copy of Fireworkz and a tool like WimpInfo which will show the handles of windows on the desktop (both of which are free to download), it may be interesting to count how many different panes are required to display a single Fireworkz document!
NetSurf, on the other hand, uses the easy option and takes advantage of what the Nested Wimp calls Furniture Windows. When writing new software which isn’t targetted at the ‘retro’ scene, the simplicity of the Nested Wimp for this task almost certainly makes it the way to go.
A full-width toolbar
To show how this works, we will take the responsive toolbar that we created in the previous chapter and make it span the full width of the window – just like NetSurf’s URL bar in Figure 8.1.
The first thing that we will need to do is to make a couple of small changes to the window templates. The toolbar will need to be wide enough to span the full width of the main window and its furniture (the vertical scroll bar on the right), so we will need to increase the toolbar’s work area by the width of that furniture. However, the Nested Wimp constrains child windows to the work area of their parent by default so, even if we do this, the toolbar would still be clipped such that it doesn’t obscure the main window’s scroll bar unless we also make a second change.
To make the design work, we will also need to designate the toolbar as being a Furniture Window, so that the Nested Wimp knows to integrate it with the main window’s furniture. This is done by setting the ‘furniture’ flag at bit 23 of the window flags; in WinEd, this is done by ticking Furniture / Foreground in the Window Behaviour section of the Edit window dialogue as seen in Figure 8.2.
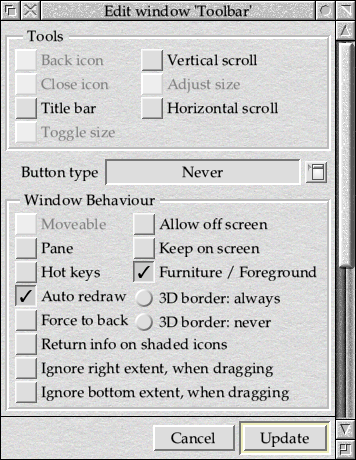
Figure 8.2: Setting the furniture flag in WinEd
The documentation notes that this flag “has no meaning for top-level windows, so the bit should always be cleared in such cases to allow for future expansion”. Our toolbar is a child window, so this isn’t a problem.
The width of the toolbar work area is currently set to be the same as that of the main window work area, so this will need to be increased to allow the toolbar to extend over the space taken up by the vertical scroll bar. The problem is in deciding how much to increase it by: we could simply add on the width of the scroll bar, but this isn’t a fixed value under RISC OS because it depends on the toolsprites which are currently in use. We could guess at a number and double it, but that doesn’t feel very satisfactory; a better option would be to leave the width the same as the main window, and adjust it when the windows are opened. As a result, with the ‘furniture’ flag set, we can save the templates and move on to updating the program itself.
More window details
To support the new style of toolbar, we will need to make some changes to PROCopen_main_window. The first thing that we need to do is adjust the extent of the toolbar’s work area, as discussed above: it must span the width of both the main window work area, and any window furniture on the outside. Before we can calculate the extent that will be required, however, we must know the extent of both the main window work area and that of the toolbar – so instead of using Wimp_GetWindowState to read the main window and toolbar details, we will use Wimp_GetWindowInfo instead.
Wimp_GetWindowInfo is similar to Wimp_GetWindowState, but instead of returning just the first 36 bytes of a window’s information block, it returns the full set of data used when calling Wimp_CreateWindow – updated to reflect the current situation, of course. It can optionally return the details of all of the icons in the window, too; again, it reflects any calls to Wimp_CreateIcon and Wimp_DeleteIcon which have occurred since the window was created.
The new calls directly replace the calls to Wimp_GetWindowState for both the main window and the toolbar window from Listing 7.1, as seen here for the main window.
REM Get the main window details.

!main% = MainWindow%
SYS "Wimp_GetWindowInfo",,main% OR %1
A similar change is made for the toolbar as well.
REM Get the toolbar details

!toolbar% = ToolBarWindow%
SYS "Wimp_GetWindowInfo",,toolbar% OR %1
Note that in both cases we set bit 0 of the address that we pass in R1 using the OR keyword: this is important, as it tells the Wimp that we do not want it to return any icon details, and enables us to rely on the required block only being 92 bytes long. If we did wish to read the icon details, we would need to call the SWI twice: once as above with bit 0 set to read the number of icons in the window, then again with bit 0 clear after making sure that we had allocated sufficient space for all of the icon details to be returned.
With the returned blocks now being 92 bytes long, instead of the 36 bytes from Wimp_GetWindowState, we will also need to adjust the way that main% and toolbar% are assigned from the block pointed to by q% in order to avoid them overwriting each other.
main% = q%
toolbar% = q% + 100
The other thing that we will need to know is the outline of the main window, so that we can align the right-hand side of the toolbar to the outside of the vertical scrollbar as seen in Figure 8.3.
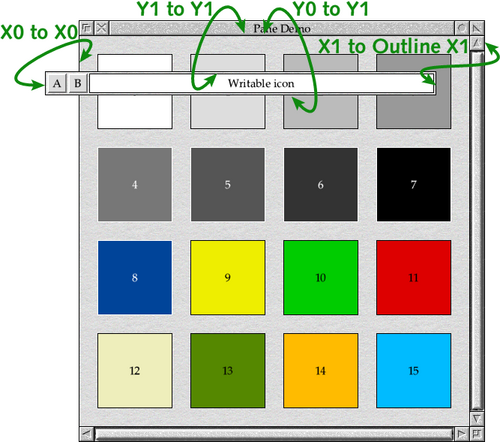
Figure 8.3: Anchoring the toolbar to the main window
The outline of a window is something that we don't often see, since the Wimp usually works in terms of the visible area; fortunately, the Wimp_GetWindowOutline SWI will tell us almost everything that we need to know. We start by setting up a new variable, main_outline%, to point to another unused bit of the block pointed to by q%.
main% = q%
toolbar% = q% + 100
main_outline% = q% + 200
Again, we have left enough space for the area pointed to by toolbar% now that we are using Wimp_GetWindowInfo instead of Wimp_GetWindowState. Next, we can add a call to Wimp_GetWindowOutline to collect details of the main window outline.
!main_outline% = MainWindow%
SYS "Wimp_GetWindowOutline",,main_outline%
This returns a bounding box at offsets 4 to 16 which completeley encloses both the main window’s visible area and all of its furniture: the title bar, scroll bars, close, back, toggle- and adjust-size buttons. As with visible areas, the X0 and Y0 values are inclusive, while the X1 and Y1 values are exclusive
Armed with this information, we can start to lay out the toolbar’s visible are relative to the main window. Vertically, the Y0 and Y1 extents remain relative the visible area of the main window, but horizontally things change a bit. The X0 extent remains relative to the visible area of the main window, but the X1 extent is set to align with its counterpart from the outline bounding box obtained from Wimp_GetWindowOutline.
toolbar%!4 = main%!4                              : REM Visible Area X0
toolbar%!8 = main%!16 - bar_height%               : REM Visible Area Y0
toolbar%!12 = main_outline%!12                    : REM Visible Area X1
toolbar%!16 = main%!16                            : REM Visible Area Y1
There is one small issue, however. The position of the pane is being set in visible area coordinates, but for X1 we’re now using the window outline in order to include the area covered by the vertical scroll bar. The outline coordinates, by definition, include the border around the edge of the window, whilst the visible area coordinates do not – although since the X1 coordinate is exclusive, both are offset by one pixel to the right as seen in Figure 8.4.
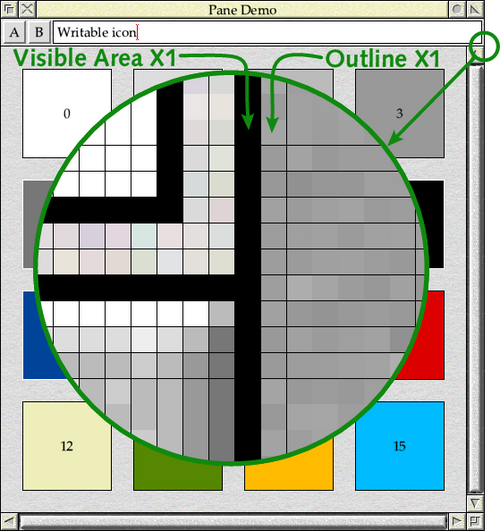
Figure 8.4: The difference between visible area and outline coordinates
In practice, it does not matter too much in this specific instance: we’re still using visible area for aligning the X0 coordinates, so the horizontal work area coodinates for the two windows will be aligned and all that will happen is that we will include one pixel too many at the top end of the horizontal axis. The Wimp will clip this out for us, since child windows can’t extend outside of their parents, and there will be no visible effects. However it can have an effect in some situations, as we’ll see later on.
Before we call Wimp_OpenWindow, we will need to ensure that the horizontal extent of the toolbar is sufficient to allow it to extend across the full width of the main window’s work area and the window furniture. To achieve this we take the width of the main window’s work area (main%!52 - main%!44), then add on the width of the main window outline (main_outline%!12 - main_outline%!4) less the width of its visible area (main%!12 - main%!4). This gives us the required horizontal extent.
The final step is to calculate the X1 value of the extent by taking the value above and adding it to the X0 value. This is used to update the extent values in the toolbar window block, before they are passed to Wimp_SetExtent.
toolbar%!52 = toolbar%!44 + (main%!52 - main%!44) + ((main_outline%!12 - main_outline%!4) - (main%!12 - main%!4))
SYS "Wimp_SetExtent", ToolBarWindow%, toolbar% + 44
Pulling all of these changes together gives us the complete PROCopen_main_window in Listing 8.1.
DEF PROCopen_main_window
LOCAL screen_width%, screen_height%, window_width%, window_height%, main%, main_outline%, toolbar%, bar_height%

REM Set up the memory blocks.

main% = q%
toolbar% = q% + 100
main_outline% = q% + 200

REM Get the main window details.

!main% = MainWindow%
SYS "Wimp_GetWindowInfo",,main% OR %1

REM If the window isn't open, resize and centre it on the screen.

IF (main%!32 AND &10000) = 0 THEN
  window_width% = WindowWidth%
  window_height% = WindowHeight%

  REM Read the screen dimensions.

  screen_width% = FNread_mode_dimension(11, 4)
  screen_height% = FNread_mode_dimension(12, 5)

  REM Ensure that the window fills no more than 75% of either dimension.

  IF window_width% > (screen_width% * 0.75) THEN window_width% = screen_width% * 0.75
  IF window_height% > (screen_height% * 0.75) THEN window_height% = screen_height% * 0.75

  REM Update the window dimensions.

  main%!4 = (screen_width% - window_width%) / 2   : REM Visible Area X0
  main%!8 = (screen_height% - window_height%) / 2 : REM Visible Area Y0

  main%!12 = main%!4 + window_width%              : REM Visible Area X1
  main%!16 = main%!8 + window_height%             : REM Visible Area Y1

  REM Reset the scroll offsets.

  main%!20 = 0                                    : REM X Scroll Offset
  main%!24 = 0                                    : REM Y Scroll Offset
ENDIF

REM Open the window at the top of the window stack.

main%!28 = -1 : REM Window to open behind (-1 is top of stack)

SYS "Wimp_OpenWindow",,main%, &4B534154, -1, &0

REM Get the outline of the main window.

!main_outline% = MainWindow%
SYS "Wimp_GetWindowOutline",,main_outline%

REM Get the toolbar details

!toolbar% = ToolBarWindow%
SYS "Wimp_GetWindowInfo",,toolbar% OR %1

REM Find the height of the toolbar pane's visible area.

bar_height% = toolbar%!16 - toolbar%!8            : REM Visible Area Y1 - Y0

REM Move the toolbar pane so that it's in the correct X and Y position
REM relative to where the main window is to go.

toolbar%!4 = main%!4                              : REM Visible Area X0
toolbar%!8 = main%!16 - bar_height%               : REM Visible Area Y0
toolbar%!12 = main_outline%!12                    : REM Visible Area X1
toolbar%!16 = main%!16                            : REM Visible Area Y1

REM Update the toolbar extent to suit the main window furniture.

toolbar%!52 = toolbar%!44 + (main%!12 - main%!4) + ((main_outline%!12 - main_outline%!4) - (main%!12 - main%!4))
SYS "Wimp_SetExtent", ToolBarWindow%, toolbar% + 44

REM Open the toolbox pane at the top of the stack, nested into the main window.

toolbar%!28 = -1

SYS "Wimp_OpenWindow",,toolbar%, &4B534154, !main%, &09A90000
PROCadjust_toolbar_content
ENDPROC
Listing 8.1: Opening the new furniture window
Bringing it together
When run, the application above should produce a window like the one in Figure 8.5.
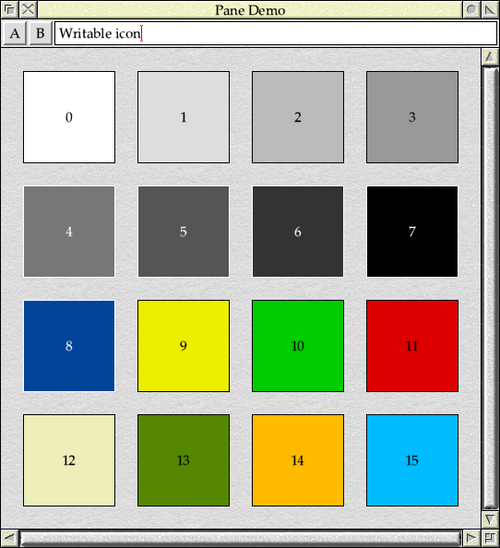
Figure 8.5: As a furniture window, the toolbar can extend into the scroll bar region
One thing to note is that we haven’t had to change the band along the top of the work area of the main window, which allows for the area obscured by the bar. Even though the toolbar has pushed the main window’s vertical scroll bar down, the work area still extends up behind the child window in the same way that it did before. All that has changed is that the vertical scroll bar no longer extends across the full height of the window’s visible area.
The complete application can be found in Download 8.1.
Whilst we’ve now covered what the Nested Wimp can do for ‘standard’ toolbars, there’s a lot more on offer. In the next chapter, we will investigate how to embed our toolbar into the scroll bar of our window.