Chapter 9: An Embedded Toolbox
Back in the late 1980s, when RISC OS was a new system, space on the screens of the day was limited and there was a trend for using minimalist toolboxes embedded into the space used by the scrollbars of a window. Of the numerous applications which used the technique, the original Ovation is still well-known – its take on the idea can be seen in Figure 9.1.
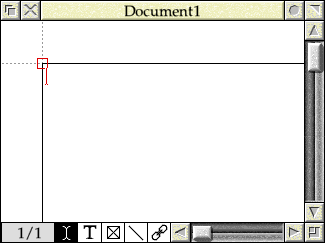
Figure 9.1: The original Ovation put its toolbox where its scroll bar should have been
At the time, Ovation’s author created this effect using three windows, which are all interleaved carefully. These days, the effect can be achieved more easily using the Nested Wimp, and in previous chapters we have already seen examples from Paint (Figure 6.1) and NetSurf (Figure 8.1) in passing.
As with the full-width toolbar that we created in the previous chapter, such toolboxes can be created using Furniture Windows. In this chapter, we will create ourselves a simple embedded toolbox in the bottom scroll bar of our window.
Updating the templates
Since we will be losing the toolbar at the top of our window, the first step to creating an embedded toolbox will be to reset our main window template back to the one that we created in Chapter 1: this will undo the changes to the work area that we made in Section 3.5. We will also delete the existing Toolbar template, leaving us with just the Main and ProgInfo window definitions as seen in Figure 9.2.
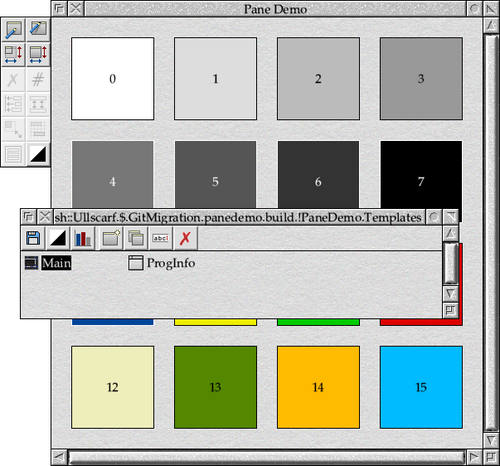
Figure 9.2: The clean set of templates from the original demo application
The next step is to create ourselves a new window for the embedded toolbox. We’ll call this “Embedded”, and it can be seen being edited by WinEd in Figure 9.3. Since we will be sizing and positioning it to fit into the scroll bar of our main window, there is no point adjusting its dimensions for now. The title has been set to “Toolbox”, but it doesn’t matter as it won’t be seen.
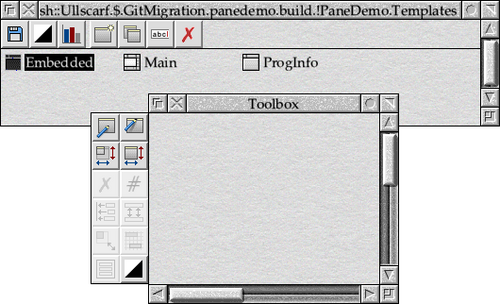
Figure 9.3: The new window template for the embedded toolbox
The window flags need to be set in a similar manner to our previous toolbars: turn off all of the window furniture (title bar, scroll bars and so on), and turn on the furniture flag. The settings in WinEd can be seen in Figure 9.4.
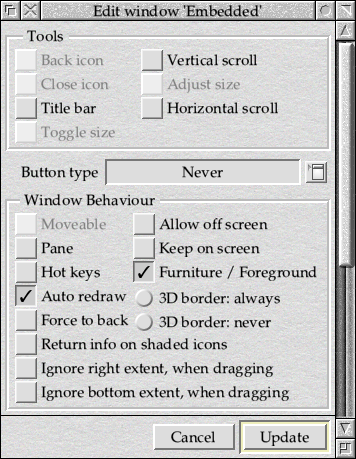
Figure 9.4: Setting the window flags for the embedded toolbox
With these changes in place, we can now save and close the templates, then move on to updating the program itself. We’ll need to update PROCinitialise in order to load the new “Embedded” template instead of the “Toolbar” that we had before – this is simply a change to the name passed to PROCtemplate_load as seen in Listing 9.1.
PROCtemplate_load("Embedded", b%, buffer_size%, -1)
SYS "Wimp_CreateWindow",,b% TO ToolBoxWindow%
Listing 9.1: Loading the Embedded template
We can also simplify the Open_Window_Request event handler in PROCpoll again. We will no longer need to make any adjustments to the contents of the toolbox, so we can delete PROCopen_window_request completely and just call Wimp_OpenWindow in the CASE statement once again as seen in Listing 9.2.
CASE reason% OF
  WHEN 2      : SYS "Wimp_OpenWindow",,b%
  WHEN 3      : SYS "Wimp_CloseWindow",,b%
  WHEN 6      : PROCmouse_click(b%)
  WHEN 9      : PROCmenu_selection(b%)
  WHEN 17, 18 : IF b%!16 = 0 THEN Quit% = TRUE
ENDCASE
Listing 9.2: The simplified event handler
Positioning the furniture
The remaining changes that we need to make reside in PROCopen_main_window, and concern the positioning of the embedded toolbox. As we saw in the previous chapter, making child windows behave as part of their parent’s furniture is simply a case of positioning them appropriately. To embed our toolbox into the horizontal scroll bar, we place it over the bar and leave the Nested Wimp to do the rest.
The process for laying the toolbox out starts out very similar to that used in the previous chapter, although we have changed the name of the toolbar% variable to toolbox%, so as to reflect the different type of pane that we’re positioning.
main% = q%
toolbox% = q% + 100
main_outline% = q% + 200
We will also amend the call to Wimp_GetWindowInfo in the same way.
!toolbox% = ToolBoxWindow%
SYS "Wimp_GetWindowInfo",,toolbox% OR %1
Working out the horizontal position of the new toolbox should be a familiar process. We will be anchoring it to the left hand side of the main window’s work area, as shown in Figure 9.5.
Figure 9.5: Horizontally anchoring the toolbox to the parent’s scroll bar
As we currently have nothing to go into the toolbox, the width is largely immaterial and so for now we will set it to 200 OS Units. Later on, when we have some content for the toolbox, we can calculate the width to contain this neatly.
Horizontally, the toolbox should align with the left-hand edge of the main window’s work area, which we achieve by aligning the X0 extents of the two windows’s visible areas. As the toolbox is a fixed width, its X1 extent is offset from the main window’s X0 extent by that width.
box_width% = 200

toolbox%!4 = main%!4                : REM Visible Area X0
toolbox%!12 = main%!4 + box_width%  : REM Visible Area X1
Positioning the toolbox in the vertical dimension, however, is more tricky than anything which we have encountered up to this point. As can be seen in Figure 9.6, we need to ensure that the top and bottom outlines of the toolbox line up with the top and bottom outlines of the main window’s horizontal scroll bar.
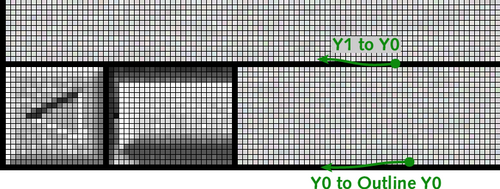
Figure 9.6: Vertically anchoring the toolbox to the parent’s scroll bar
The Y0 coordinate for the visible area of the toolbox must line up with the Y0 coordinate of the main window’s outline. As we saw in the previous chapter, the outline includes the window border, and so its X0 is one pixel further down the screen than the X0 of the visible area will be.
On this occasion, however, we can no longer rely on the Wimp clipping the visible area of the toolbox for us. If we look at the Y1 coordinate of the toolbox visible area, we can see that it must be aligned to the Y0 coordinate of the main window’s visible area. The Y1 is exclusive, while the Y0 is inclusive, so we’re actually aligning the border of the toolbox with the bottom pixel of the main window’s visible area – again, we’re a pixel adrift!
From this, we can see that the height of the toolbox visible area will be
box_height% = (main%!8 - pixel_height%) - (main_outline%!8 + pixel_height%)
where pixel_height% is a variable holding the number of OS Units which represent the height of a pixel in the current screen mode. This will vary between modes but, as we saw when we created our simple application, we can read the information in the form of the vertical eigenfactor and then convert that in to OS Units by raising 2 to its power.
SYS "OS_ReadModeVariable", -1, 5 TO ,,eigenfactor%
pixel_height% = 2 ^ eigenfactor%
With the toolbox positioned, the final thing to do before opening it as a child window is to use Wimp_SetExtent to ensure that its extent is sufficient to cover the whole visible area.
toolbox%!52 = toolbox%!44 + box_width%
toolbox%!48 = toolbox%!56 - box_height%
SYS "Wimp_SetExtent", ToolBoxWindow%, toolbox% + 44
For reasons which will become apparent a little later, we will split this code out into a separate procedure called PROCarrange_toolbox, which is shown in Listing 9.3.
DEF PROCarrange_toolbox(main%, main_outline%, toolbox%)
LOCAL box_width%, box_height%, eigenfactor%, pixel_width%, pixel_height%, icon_height%, icon_width%, icon%

REM Get the outline of the main window.

!main_outline% = MainWindow%
SYS "Wimp_GetWindowOutline",,main_outline%

REM Get the toolbox details

!toolbox% = ToolBoxWindow%
SYS "Wimp_GetWindowInfo",,toolbox% OR %1

REM Find the height of the toolbox pane's visible area.

SYS "OS_ReadModeVariable", -1, 5 TO ,,eigenfactor%
pixel_height% = 2 ^ eigenfactor%

box_height% = (main%!8 - pixel_height%) - (main_outline%!8 + pixel_height%)
box_width% = 200

REM Move the toolbox pane so that it's in the correct X and Y position
REM relative to where the main window is to go.

toolbox%!4 = main%!4                              : REM Visible Area X0
toolbox%!8 = main_outline%!8 + pixel_height%      : REM Visible Area Y0
toolbox%!12 = main%!4 + box_width%                : REM Visible Area X1
toolbox%!16 = toolbox%!8 + box_height%            : REM Visible Area Y1

REM Update the toolbox extent to suit the main window furniture.

toolbox%!52 = toolbox%!44 + box_width%
toolbox%!48 = toolbox%!56 - box_height%
SYS "Wimp_SetExtent", ToolBoxWindow%, toolbox% + 44
ENDPROC
Listing 9.3: Arranging the embedded toolbox
This can be called from PROCopen_main_window, in between opening the main window itself and opening the toolbox as a child. The toolbox is anchored a little differently to what we have seen before, as it is connected to the left and bottom of the main window’s work area. This results in us using flags of &05550000.
toolbox%!28 = -1

SYS "Wimp_OpenWindow",,toolbox%, &4B534154, !main%, &05550000
With these changes included, PROCopen_main_window should now look as shown in Listing 9.4.
DEF PROCopen_main_window
LOCAL screen_width%, screen_height%, window_width%, window_height%, main%, main_outline%
LOCAL toolbox%, box_width%, box_height%, eigenfactor%, pixel_height%

REM Set up the memory blocks.

main% = q%
toolbox% = q% + 100
main_outline% = q% + 200

REM Get the main window details.

!main% = MainWindow%
SYS "Wimp_GetWindowInfo",,main% OR %1

REM If the window isn't open, resize and centre it on the screen.

IF (main%!32 AND &10000) = 0 THEN
  window_width% = WindowWidth%
  window_height% = WindowHeight%

  REM Read the screen dimensions.

  screen_width% = FNread_mode_dimension(11, 4)
  screen_height% = FNread_mode_dimension(12, 5)

  REM Ensure that the window fills no more than 75% of either dimension.

  IF window_width% > (screen_width% * 0.75) THEN window_width% = screen_width% * 0.75
  IF window_height% > (screen_height% * 0.75) THEN window_height% = screen_height% * 0.75

  REM Update the window dimensions.

  main%!4 = (screen_width% - window_width%) / 2   : REM Visible Area X0
  main%!8 = (screen_height% - window_height%) / 2 : REM Visible Area Y0

  main%!12 = main%!4 + window_width%              : REM Visible Area X1
  main%!16 = main%!8 + window_height%             : REM Visible Area Y1

  REM Reset the scroll offsets.

  main%!20 = 0                                    : REM X Scroll Offset
  main%!24 = 0                                    : REM Y Scroll Offset
ENDIF

REM Open the window at the top of the window stack.

main%!28 = -1 : REM Window to open behind (-1 is top of stack)

SYS "Wimp_OpenWindow",,main%, &4B534154, -1, &0

REM Position the toolbox.

PROCarrange_toolbox(main%, main_outline%, toolbox%)

REM Open the toolbox pane at the top of the stack, nested into the main window.

toolbox%!28 = -1

SYS "Wimp_OpenWindow",,toolbox%, &4B534154, !main%, &05550000
ENDPROC
Listing 9.4: Opening the embedded toolbox
Running the application will produce a window with an empty toolbox embedded into the horizontal scroll bar, as seen in Figure 9.7.
![]()
Figure 9.7: An empty toolbox is embedded into the horizontal scroll bar
The application as it stands so far can be found in Download 9.1.
Adding some icons
A toolbox isn’t much use without some icons in it, so the next thing that we will need to do is to add some. Unlike all of our previous panes, however, the critical dimension – the height of the toolbox window, which will determine the size of the icons within it – is dependent on a factor outside of our control. It is defined by the height of the horizontal scroll bar, which in turn will depend on the desktop theme and mode that user has selected.
As a result, we will need to arrange the icons in the toolbox as we align it to the main window. This isn’t a problem: we’ve already seen how to move icons around using Wimp_ResizeIcon in several of the previous examples – it just adds another step to the process of opening the window.
The first thing that we will do is to add four icons to the “Embedded” window template. Since we will be adjusting their size and position when the window is opened, it doesn’t matter where they go in the template: for ease of editing, we’ve done it as seen in Figure 9.8. Keeping them in numerical order by their handles, from 0 on the left to 3 on the right, will make working on the design a lot easier!
![]()
Figure 9.8: Adding some icon definitions to the toolbox template
Given that space is limited, we will lay the toolbox out with the minimum of wasted real estate as shown in Figure 9.9: a border of one pixel around the outside of the icons, and one pixel between each icon. Usually icons are placed on a grid of 4 by 4 OS Units to ensure that designs will work in all modes including the old rectangular pixel ones found on early systems (see the Style Guide for details), but since we’re reading the mode details when we arrange the toolbox, it is safe to only worry about matching the capability of the current screen mode.
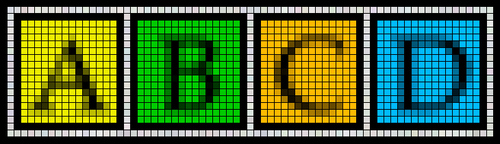
Figure 9.9: The intended layout of the toolbox icons
As before, we start by reading the vertical size of a pixel in OS Units, and use that to calculate the height of both the visible area and work area of the toolbox – the value, also in OS Units, is stored in the box_height% variable. Once we have this, we can use it to calculate the height of an icon: the height of the toolbox, less a pixel above and a pixel below. The value is stored in the icon_height% variable.
SYS "OS_ReadModeVariable", -1, 5 TO ,,eigenfactor%
pixel_height% = 2 ^ eigenfactor%

box_height% = (main%!8 - pixel_height%) - (main_outline%!8 + pixel_height%)
icon_height% = box_height% - 2 * pixel_height%
With the vertical layout sorted out, we can move on to the horizontal. Again, we use OS_ReadModeVariable to read the width of a pixel in OS Units, then use this to establish the width of each icon. We want them to be square, or as close to square as we can get, but in case we’re in a rectangular pixel mode we take the height of the icon in OS Units and round it to a multiple of the pixel width.
SYS "OS_ReadModeVariable", -1, 4 TO ,,eigenfactor%
pixel_width% = 2 ^ eigenfactor%

icon_width% = (icon_height% + (pixel_width% - 1)) AND (NOT pixel_width%)
If we look at the layout of the icons in Figure 9.10, taken in Mode 15 where pixels are taller than they are wide, we can see why this step is necessary.
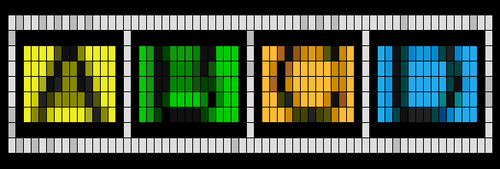
Figure 9.10: The layout of the icons can also handle modes with rectanguar pixels
The final step is to work out the width of the toolbox. In the example above we just set this to 200 OS Units, but now we need to calculate the space required to hold all of the icons. The number of icons in the template was returned by Wimp_GetWindowInfo, at offset 88 into the block pointed to by toolbox%. We can multiply this by the sum of the icon width and the width of the single pixel space between them, then add on an extra pixel for the end of the row.
box_width% = toolbox%!88 * (icon_width% + pixel_width%) + pixel_width%
Armed with all of these dimensions, we can lay the visble area of the toolbox out as before. Once that is done, we must step through each icon in turn and update its pisition using Wimp_ResizeIcon.
FOR icon% = 0 TO toolbox%!88 - 1
  xpos% = toolbox%!44 + icon% * (icon_width% + pixel_width%) + pixel_width%
  SYS "Wimp_ResizeIcon", ToolBoxWindow%, icon%, xpos%, toolbox%!48 + pixel_height%, xpos% + icon_width%, toolbox%!56 - pixel_height%
NEXT icon%
Again we use the number of icons returned by Wimp_GetWindowInfo, so that the code will handle changes to the templates without fuss. For each icon, xpos% is set to the X0 coordinate by adding the minumum work area coordinate from toolbox%!44 to a suitable offset. This is the same calculation that was used to set the size of the window, because each icon will be placed on what would have been the X1 extent of the work area of a window with one fewer icons in it.
The coordinates passed to Wimp_ResizeIcon are xpos% and xpos% plus the icon width in the horizontal direction, along with the Y0 and Y1 extents of the work area inset by a single pixel.
With these changes added to the code, PROCarrange_toolbox should now look as seen in Listing 9.5.
DEF PROCarrange_toolbox(main%, main_outline%, toolbox%)
LOCAL box_width%, box_height%, eigenfactor%, pixel_width%, pixel_height%, icon_height%, icon_width%, icon%

REM Get the outline of the main window.

!main_outline% = MainWindow%
SYS "Wimp_GetWindowOutline",,main_outline%

REM Get the toolbox details

!toolbox% = ToolBoxWindow%
SYS "Wimp_GetWindowInfo",,toolbox% OR %1

REM Find the height of the toolbox pane's visible area.

SYS "OS_ReadModeVariable", -1, 5 TO ,,eigenfactor%
pixel_height% = 2 ^ eigenfactor%

box_height% = (main%!8 - pixel_height%) - (main_outline%!8 + pixel_height%)
icon_height% = box_height% - 2 * pixel_height%

SYS "OS_ReadModeVariable", -1, 4 TO ,,eigenfactor%
pixel_width% = 2 ^ eigenfactor%

icon_width% = (icon_height% + (pixel_width% - 1)) AND (NOT pixel_width%)
box_width% = toolbox%!88 * (icon_width% + pixel_width%) + pixel_width%

REM Move the toolbox pane so that it's in the correct X and Y position
REM relative to where the main window is to go.

toolbox%!4 = main%!4                          : REM Visible Area X0
toolbox%!8 = main_outline%!8 + pixel_height%  : REM Visible Area Y0
toolbox%!12 = main%!4 + box_width%            : REM Visible Area X1
toolbox%!16 = toolbox%!8 + box_height%        : REM Visible Area Y1

REM Update the toolbox extent to suit the main window furniture.

toolbox%!52 = toolbox%!44 + box_width%
toolbox%!48 = toolbox%!56 - box_height%
SYS "Wimp_SetExtent", ToolBoxWindow%, toolbox% + 44

REM Adjust the icon positions to suit the toolbox extent.

FOR icon% = 0 TO toolbox%!88 - 1
        xpos% = toolbox%!44 + icon% * (icon_width% + pixel_width%) + pixel_width%
        SYS "Wimp_ResizeIcon", ToolBoxWindow%, icon%, xpos%, toolbox%!48 + pixel_height%, xpos% + icon_width%, toolbox%!56 - pixel_height%
NEXT icon%
ENDPROC
Listing 9.5: Positioning the icons in the toolbox
When the code is run, the window should now look something like the one in Figure 9.11 – the toolbox now has some icons in it!
Figure 9.11: The embedded toolbox complete with icons
One of the things that is worth noting here is the very limited – not to mention variable – space available for the icons in the toolbox. Care needs to be taken when designing the contents, to ensure that it can handle different screen modes and sizes of scroll bar whilst remaining clear and intuitive to the user. This is a problem that is getting worse as screen sizes increase, and it may be that in a modern application, embedded toolboxes are best limited to the kinds of uses seen in Paint (Figure 6.1) and NetSurf (Figure 8.1).
The full application with the code to position the icons can be found in Download 9.2.
Changes of mode
Although our new toolbox appears to be working nicely, there is one gotcha waiting to bite. The layout of the child window relative to its parent depends on the size of a pixel in the current screen mode at the time when the window was opened, so what happens if the mode is changed whilst the window is on screen?
The answer, of course, is that things may end up going out of alignment. Figure 9.12 shows the window after a change in mode: in this case from “Big Mode” (a mode where the X and Y eigenfactors are both zero) to a mode with more conventional settings (with eigenfactors of one). The icons are no longer spaced neatly and, worse, the toolbox window is no longer aligned with the main window furniture.
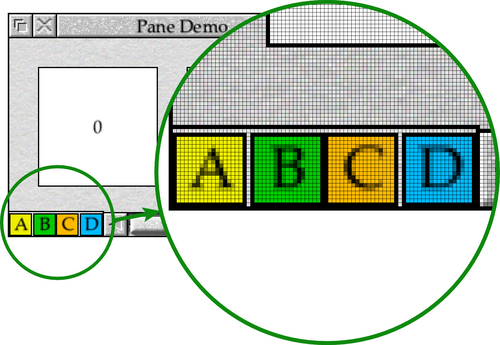
Figure 9.12: The carefully-aligned windows may not survive a mode change
Fortunately the solution is simple: if a mode change occurs whilst our window is open, we should calculate all of the positioning again and then re-open it. Recalculating the position is fairly straight-forward, as we can re-use the positioning code in PROCarrange_toolbox to do the hard work. We start out by setting up the pointers in main%, toolbox% and main_outline%, before calling Wimp_GetWindowInfo for the main window. We kept this separate from PROCarrange_toolbox earlier, because now we must check that the window is actually open before doing any re-arranging – this can be done by testing the window flags in the usual way.
We don’t call Wimp_OpenWindow for the main window, as it should already have been positioned in a suitable place for the new mode by the Wimp. Instead, we call PROCarrange_toolbox to calculate the toolbox position, then call Wimp_OpenWindow to apply it. In contrast to the code in PROCopen_main_window, we do not adjust the position of the toolbox in the window stack and so it should remain in the correct position relative to its parent.
Bringing all of this code together results in the procedure in Listing 9.6.
DEF PROCrecalculate_toolbox
LOCAL main%, main_outline%, toolbox%

REM Set up the memory blocks.

main% = q%
toolbox% = q% + 100
main_outline% = q% + 200

REM Get the main window details.

!main% = MainWindow%
SYS "Wimp_GetWindowInfo",,main% OR %1

REM If the main window isn't open, do nothing.

IF (main%!32 AND &10000) = 0 THEN ENDPROC

REM Reposition the toolbox.

PROCarrange_toolbox(main%, main_outline%, toolbox%)

REM Reopen the toolbox pane nested into the main window.

SYS "Wimp_OpenWindow",,toolbox%, &4B534154, !main%, &05550000
ENDPROC
Listing 9.6: Recalculating the toolbox on a mode change
In order to be able to call PROCrecalculate_toolbox whenever the mode changes, we will need to listen out for the Message_ModeChange User Message, which has the code &400C1. The Wimp sends this around all interested applications once a mode change has completed, and it will give us the cue that we require.
In order to be sent Message_ModeChange, we will need to update PROCinitialise as seen in Listing 9.7 so that our call to Wimp_Initialise includes a request to receive it. Up to now, we have passed zero in R3, which indicates that we only wish to receive the obligatory Message_Quit. To add Message_ModeChange to the messages that the Wimp will send us, we need to create a list of the message numbers that interest us in memory, then pass a pointer to that in R3 instead. The list is zero-terminated, which happens to also correspond to Message_Quit.
q%!0 = &400C1 : REM Message_ModeChange
q%!4 = 0      : REM Message_Quit & End of List

SYS "Wimp_Initialise", 380, &4B534154, TaskName$, q%
Listing 9.7: Requesting to be sent Message_ModeCHange
To allow us to handle the new message, we will update the CASE statement which dispatches our Wimp_Poll events as shown in Listing 9.8. Instead of simply setting the Quit% variable to TRUE when Message_Quit is received, we will instead call a new procedure called PROCuser_message which can then the different codes which are received.
CASE reason% OF
  WHEN 2      : SYS "Wimp_OpenWindow",,b%
  WHEN 3      : SYS "Wimp_CloseWindow",,b%
  WHEN 6      : PROCmouse_click(b%)
  WHEN 9      : PROCmenu_selection(b%)
  WHEN 17, 18 : PROCuser_message(b%)
ENDCASE
Listing 9.8: Adding a user message handler to the event dispatch
PROCuser_message itself is fairly simple, and can be seen in Listing 9.9. It contains a CASE structure to test the reason code of the incoming message, and call appropriate code in each case. A Message_Quit still sets the Quit% variable to TRUE, while Message_ModeChange will in turn call the new PROCrecalculate_toolbox procedure.
DEF PROCuser_message(b%)
CASE b%!16 OF
WHEN 0      : REM Message_Quit
  Quit% = TRUE
WHEN &400C1 : REM Message_ModeChange
  PROCrecalculate_toolbox
ENDCASE
ENDPROC
Listing 9.9: Handling user messages
With all of these changes in place, the full application can be found in Download 9.3. There should no functional differences from the previous version, besides its ability to more gracefully handle mode changes.