Chapter 31: Window Redraw Theory
So far in our investigations into the Wimp, we have managed to create all of our windows using just icons. For a lot of purposes – especially standard dialogue boxes – this is fine: it’s what icons are designed to do, and leaving the Wimp to handle all of the work of drawing the window contents on to the screen is a lot easier than trying to do it ourselves.
Depending on the type of applications that they work on, developers may find that this approach is fine for the vast majority – if not all – of the applications that they create. However, there are many places where icons don’t work well. An obvious example are windows in which documents or graphics are created, such as ArtWorks or Ovation Pro files, where a mixture of arbitrary text and graphics need to be displayed. A less obvious situation would be when displaying tabular data like a spreadsheet: icons could be used, but this quickly becomes slow and – as we saw before we introduced window templates – keeping track of all of the indirected data that we need soon becomes a headache.
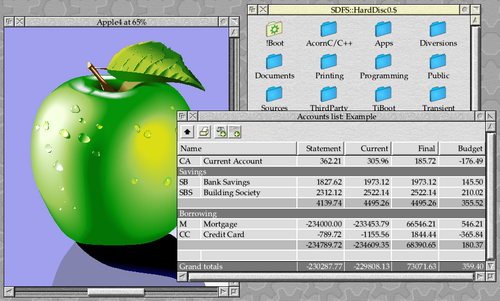
Figure 31.1: Three windows which use manual redraw
For many applications, including ArtWorks on the left of Figure 31.1, the best approach is to use a completely blank window and redraw everything that they need from first principles using OS_Plot, the Draw module and the Font manager. If the need is for something more ‘icon-like’, such as the table from CashBook on the bottom-right, then there is a middle ground available to us: we can handle the redraw ourselves, but use the Wimp’s icon plotting routines to do a lot of the hard work for us. Another good example of this hybrid approach is the Filer, seen top-right, which needs to display arbitrary collections of files and directories as icons in a window.
A contrived example
As might be expected, there will be a fair bit of new code needed before our application can redraw a window of its own, so we’ll start by getting some groundwork in place. It might be useful if our application could save the results of our calculations in a table for future reference, so let’s create a results window to do just that.
Out first stop is in WinEd, to create a new window within our template file. We have called this “Results”, and it can be seen in Figure 31.2.
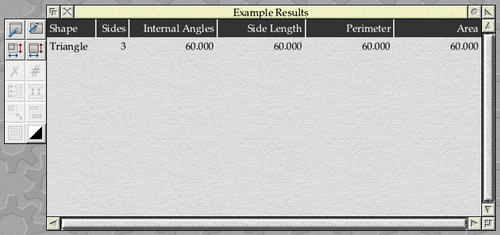
Figure 31.2: Our new window template
For now, there will be few surprises in the new template. There are a couple of rows of icons along the top of the window, which will represent the rows and columns in our data table. Their widths have been sized to hold the longest text: the name of the shape in the first column, the text “Sides” in the second column, and the longest title – which is “Internal Angles” – in columns three to six.
With the icons spaced out neatly, the window’s work area has been sized from 0 to 1260 OS units horizontally to fit. Vertically, the height of the icons is 52 OS units and so work area has been sized vertically from 0 to −572 OS units to accommodate ten lines of results and the title row.
The icons themselves are standard label icons, using the Comment icon from WinEd’s Icon picker. We have changed the colours of the title row icons and adjusted the text alignment to get the desired appearance. The icons in the second row, which will eventually be used to display our data, have all been set to be indirected.
If any of this seems new or surprising, have a look back at Chapter 19 where we introduced window templates, and Chapter 21 where we defined the work area of our main window.
If you know anything about window redraw already, you may be surprised that we haven’t unticked the Auto redraw flag for the new window. This is because, for simplicity, we’ll leave the Wimp to handle the redraw of our new window until we have it installed within the application code. It’s always worth remembering that any redraw code related to a window can be taken out of use at any time for debugging by simply setting this flag in the window’s definition.
The results module
Moving to our application’s source code, we will add a results module to look after the new window. Initially this will be very similar in concept to the ibar and win modules that we already have, so instead of describing the following pieces of code in detail, we will refer back to where we previously introduced the concepts that we will need.
We will be adding a pair of new files – c.results and h.results – to create the new module, so our first step will be to update the OBJS list in the Makefile to include a reference to it.
OBJS = calc main menu ibar win results
The interface to the rest of the application will initially be very similar to the one used by the win module to look after the main window, and can be seen in Listing 31.1 – take a look back at Listing 11.2 in Chapter 11 if you need a reminder of how we got here.
 /**
 * Example 31.1
 *
 * (c) Stephen Fryatt, 2026
 *
 * File: results.h
 */

#ifndef EXAMPLEAPP_RESULTS
#define EXAMPLEAPP_RESULTS

/* Results Initialisation. */

void results_initialise(void);

/* Open the Window. */

void results_open(void);

#endif
Listing 31.1 (h.results): The header file to define the results module’s interface
Our new results_initialise() function will need to be called from within main_initialise() in c.main, and we can add that call alongside the calls to the other initialisation functions as seen in Listing 31.2.
/* Initialise the program modules. */

calc_initialise();
ibar_initialise(main_application_sprite);
win_initialise(sprites);
results_initialise();
Listing 31.2: Initialising the results module
We can open the new results window with the currently unused Adjust-click on our iconbar icon, and this can be achieved by updating the ibar_mouse_click() function within c.ibar as seen in Listing 31.3.
/* Mouse Click event handler */

static void ibar_mouse_click(wimp_pointer *pointer)
{
        switch (pointer->buttons) {
        case wimp_CLICK_SELECT:
                win_open();
                break;
        case wimp_CLICK_ADJUST:
                results_open();
                break;
        }
}
Listing 31.3: Opening the results window from the iconbar icon
Initialising the new results window and its associated menu is done within the results_initialise() function, as seen in Listing 31.4.
/* Results Menu Entries. */

#define RESULTS_MENU_CLEAR 0

/* Global Variables. */

static wimp_w results_handle = NULL;
static wimp_menu *results_menu = NULL;

/* Function Prototypes. */

static void results_menu_selection(wimp_w window, wimp_menu *menu, wimp_selection *selection);

/* Results Window Initialisation. */

void results_initialise(void)
{
        wimp_window             *window_definition;

        /* Load and create the window. */

        window_definition = windows_load_template("Results");
        if (window_definition == NULL) {
                error_msgs_report_error("BadResultsTempl");
                return;
        }

        results_handle = wimp_create_window(window_definition);
        free(window_definition);

        /* Window Menu. */

        results_menu = menu_create("ResultsMenu", 1);
        if (results_menu == NULL) {
                error_msgs_report_error("BadResultsMenu");
                return;
        }

        menu_entry(results_menu, RESULTS_MENU_CLEAR, "ResultsMenu0", NULL);

        /* Register event handlers. */

        event_add_window_menu(results_handle, results_menu);
        event_add_window_menu_selection(results_handle, results_menu_selection);
}
Listing 31.4: Initialising the results window
We start by defining two global variables within the module: results_handle to hold the handle of the results window and results_menu to hold a pointer to the results window menu. The RESULTS_MENU_CLEAR constant is defined for the single entry that our new menu will have, and a prototype is set up for the results_menu_selection() function, to handle menu selections.
Within the function itself, we load the template for the window into a block of memory pointed to by *window_definition, then call Wimp_CreateWindow to create the window and free the block afterwards. This should all be familiar from Chapter 19.
The menu is defined by calling menu_create() and menu_entry(), in the same way that we do for the main window and iconbar menus – see Chapter 22, Chapter 25 and Chapter 29 for a reminder on how this works.
Finally, the menu is registered with the window and a handler is registered for receiving user selections – see Chapter 26 for details of SFLib’s support for menus and event handlers.
The results_menu_selection() function for handling menu selections is defined in Listing 31.5. This is just a placeholder for now, and selection events will simply be ignored.
The final piece of code that we need is the results_open() function, defined in Listing 31.6. This should be familiar from Chapter 13 and Chapter 20, when we created and then later modified the win_open() function.
/* Open the Window. */

void results_open(void)
{
        windows_open_centred_on_screen(results_handle);
}
Listing 31.6: Opening the results window on screen
The final thing that we need to do is to add the new message tokens to our messages file. Again, see Chapter 29 for an explanation.
ResultsMenu:Results
ResultsMenu0:Clear contents
BadResultsMenu:Failed to create Results Menu
BadResultsTempl:Failed to load Results template
With all of these changes in place, we should have an application with a results window: this can be opened, as seen in Figure 31.3, using an Adjust click on the iconbar icon.
Figure 31.3: Our new results window in action
The updated code as it stands can be found in Download 31.1. There should be nothing surprising or unexpected here if you have followed the tutorial up to this point, but it would be worth making sure that you understand what has been added before we move on to make any changes!
Icon definitions
We have already noted that there are a range of approaches to drawing window content, from the completely Do-It-Yourself approach through to using the Wimp’s icon plotting routines. If we’re going to take the latter route, then we will need some standard icon data blocks to give to the Wimp; often, a good approach is to create these in the template for the window which is to be redrawn. This allows the icons to be designed graphically in a template editor, which is usually easier than creating them programatically.
As it stands in Download 31.1, our application is allowing the Wimp to create all of the icons in the Results window when the definition is passed to Wimp_CreateWindow, so that they appear when the window is opened. However, we can change this by altering the value of window_definition->icon_count in results_initialise(), between loading the template and passing the definition to wimp_create_window().
If we wanted a completely empty window in which to draw our content, we could simply set the value to zero.
window_definition->icon_count = 0;
However, we are going to take an even more hybrid approach here: we will leave the Wimp to draw the icons in the heading line as normal, but will plot the lines of saved results data ourselves. This makes sense, as we don’t know how many sets of results data there will be: it could be a couple of lines, or it could potentially be hundreds of even thousands (although, spoiler, to keep things simple, we won’t be implementing limitless results storage in our example).
We will start by defining some constants for the icons in our window template, in the usual way.
/* Results Window Icons. */

#define RESULTS_TITLE_ICONS 6

#define RESULTS_ICON_TITLE_SHAPE 0
#define RESULTS_ICON_TITLE_SIDES 1
#define RESULTS_ICON_TITLE_INTERNAL_ANGLES 2
#define RESULTS_ICON_TITLE_SIDE_LENGTH 3
#define RESULTS_ICON_TITLE_PERIMETER 4
#define RESULTS_ICON_TITLE_AREA 5
#define RESULTS_ICON_ROW_SHAPE 6
#define RESULTS_ICON_ROW_SIDES 7
#define RESULTS_ICON_ROW_INTERNAL_ANGLES 8
#define RESULTS_ICON_ROW_SIDE_LENGTH 9
#define RESULTS_ICON_ROW_PERIMETER 10
#define RESULTS_ICON_ROW_AREA 11
One thing to note here is that whilst the specific icon handles don’t matter, it is important to ensure that we wish to let the Wimp create as normal must have lower handles than those which we intend to be used only as data blocks for the redraw process. We can see above (and by checking the templates file) that the title icons are numbered from 0 through to 5, and the icons which will form the data rows are numbered from 6 though to 11.
In addition to the icon handle definitions, we have also defined RESULTS_TITLE_ICONS to give the number of icons that form the title row in our design. This means that instead of setting icon_count to zero, we can set it to the number of icons that we wish to be created.
window_definition->icon_count = RESULTS_TITLE_ICONS;
We will also need to be able to access these icon definitions when we come to redraw our window. To this end, we will create a new global variable within c.results which can point to the icon definitions.
static wimp_icon *results_icons = NULL;
This can then be assigned within results_initialise(), once we have a pointer to the window definition returned from windows_load_template().
results_icons = window_definition->icons;
The window definition returned by windows_load_template() is in a block of memory allocated by malloc(), so it won’t disappear when we exit the results_initialise(). However, we do need to remove the call to free() the memory after calling wimp_create_window().
With the changes in place, the results_initialise() now looks as seen in Listing 31.7.
/* Results Window Initialisation. */

void results_initialise(void)
{
        os_error                *error;
        wimp_window             *window_definition;

        /* Load and create the window. */

        window_definition = windows_load_template("Results");
        if (window_definition == NULL) {
                error_msgs_report_error("BadResultsTempl");
                return;
        }

        window_definition->icon_count = RESULTS_TITLE_ICONS;

        results_icons = window_definition->icons;

        results_handle = wimp_create_window(window_definition);

        /* Window Menu. */

        results_menu = menu_create("ResultsMenu", 1);
        if (results_menu == NULL) {
                error_msgs_report_error("BadResultsMenu");
                return;
        }

        menu_entry(results_menu, RESULTS_MENU_CLEAR, "ResultsMenu0", NULL);

        /* Register event handlers. */

        event_add_window_menu(results_handle, results_menu);
        event_add_window_menu_selection(results_handle, results_menu_selection);
}
Listing 31.7: Initialising the results window
When initialisation is complete, the icon data blocks will all remain in memory, and can be accessed from anywhere within c.results through the *results_icons pointer.
If we compile and run this code now, we should see that only the column headings icons are visible in the results window, as seen in Figure 31.4. However, checking the templates file should confirm that all of the icons, including those intended for the data rows, are still defined there.
![]()
Figure 31.4: Hiding the icon definitions
To make it easier to follow the changes, Download 31.2 contains the changes so far.
Redraw requirements
If you’re familiar with writing software outside of the desktop, the way that window redraw works can seem somewhat counter-intuitive at first. When you want something to appear on the screen in a single-tasking application, you write or plot it to the screen; it then stays there until you plot over it with something else or clear the screen. On the desktop, things are not that simple.
The main difference is that our application won’t be the only thing running on the system or writing to the screen. It must therefore only plot to the area within its windows, and – as we saw back in Chapter 12 – only part of a window’s work area may be visible at any given time. There may also be other windows over ours, obscuring parts of them. Even worse, if another window or menu is dragged over one of ours, it will obliterate anything within our window that is in its path; when our window comes to the front again, its content will need to be reinstated.
As we might expect from the way that our application already interacts with other things like mouse clicks and keypresses, window redraw is an event driven process. If we don’t set the wimp_WINDOW_AUTO_REDRAW flag in our window definition (or, in other words, clear Auto redraw in the template), then the Wimp will deliver us a Redraw_Window_Request event for the window whenever some or all of its contents need to be redrawn to the screen. As part of the event data, the Wimp will describe the area or areas which need to be plotted and we must comply immediately.
This leads to a second surprising consideration. If we wish to plot something to our window – perhaps the user has just saved a new result, which we need to add to our table – then we can’t just go and plot it. Instead, we must tell the Wimp that we wish to update our window’s contents, then wait for a Redraw_Window_Request event to arrive before the new content can be displayed. If the new content is in a part of the work area which isn’t currently visible to the user, that Redraw_Window_Request event may not come for some time.
This leads us on to another potentially surprising consideration. An application which is redrawing its own data into a window will almost inevitably need to keep a full copy of that data internally, as it can be asked to redraw any part of the window at any time. This might be the application’s raw data (for example, a word processor might just hold the document structure and render areas of the page from that when needed); at the other extreme, it may be easiest to render graphics to a sprite which can be plotted to screen on demand. Which route to take will depend a bit on the application, although I would usually lean towards keeping the data as ‘raw’ as possible and plotting on demand as this is likely to minimise memory usage.
Adding a redraw loop
With the background laid, let’s start to add some redraw code to our application. The first thing to do is to open the Redraw window template, go into the Edit window dialogue, and turn off the Auto redraw flag under Window behaviour (this is in WinEd, but other template editors will have a similar option). The window should start to display with a hatched background as seen in Figure 31.5, which is the template editor’s way of showing us that it requires manual redrawing – most of the template editors, from FormEd onwards, use a similar approach.
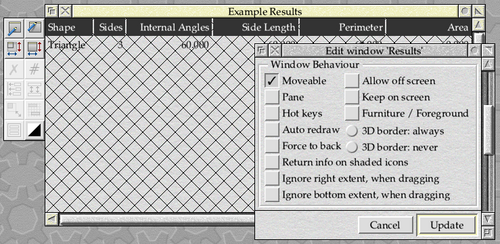
Figure 31.5: Turning auto redraw off
With this change made, however, we must now update our application to correctly respond to Redraw_Window_Request events. Up to now, perhaps with the exception of not passing on keypresses correctly, it hasn’t been too critical how we have reacted to events that the Wimp has sent us. However, when the Wimp sends us a wimp_REDRAW_WINDOW_REQUEST reason code through Wimp_Poll, we must respond correctly or our application will hang.
The memory block that the Wimp supplies with redraw events contains only a wimp_w window handle, which identifies the window which is to be redrawn. The Wimp’s API for redrawing leans heavily on the idea of passing the same block between a number of SWI calls, however, so OSLib types it as a wimp_draw structure with only the w element containing valid data: this avoids the need for us to cast the type during the redraw process.
struct wimp_draw
{
        wimp_w  w;
        os_box  box;
        int     xscroll;
        int     yscroll;
        os_box  clip;
};

typedef struct wimp_draw wimp_draw;
As we noted earlier, on receipt of a Redraw_Window_Request event our application must immediately call Wimp_RedrawWindow – in fact, the Programmer’s Reference Manual states that calling this SWI must be “the first Wimp operation after the Wimp_Poll which returned a Window_Redraw_Request”.
In the process which follows, the Wimp will break the full area to be redrawn down into a series of rectangles which it will ask us to deal with one by one. If the whole window contents need to be redrawn for some reason then this might simply be the whole of the visible area in one rectangle. If our window is behind another one, however, then we might receive two or more: Figure 31.6 shows a situation where we might receive details of two rectangles which need to be handled.
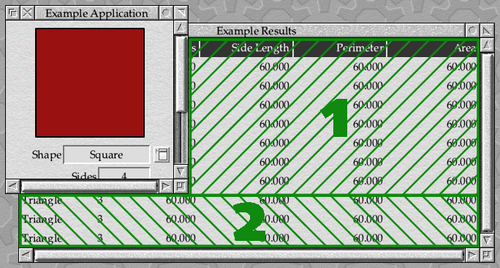
Figure 31.6: How the Wimp breaks down a redraw
Another situation could be where our window’s menu has just closed: this might result in a much smaller area being requested, as seen in Figure 31.7.
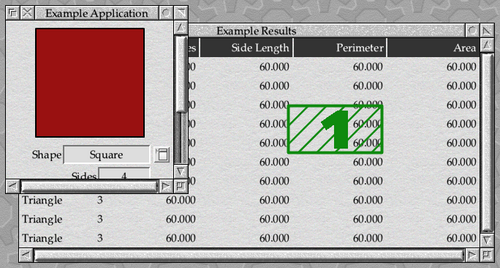
Figure 31.7: A redraw area might be a window shadow
This process of receiving rectangles is launched by the call to Wimp_RedrawWindow, which takes a pointer to the wimp_draw block that came with the event, and returns with the other fields in the block filled in for the first rectangle in the sequence.
extern osbool wimp_redraw_window(
        wimp_draw *redraw
);
In addition to completing the supplied wimp_draw block, wimp_redraw_window() also returns an osbool value which is TRUE if there is a rectangle to be redrawn; in the unlikely (but presumably possible) event that it returns FALSE, then there is in fact nothing for our application to do.
Assuming that wimp_redraw_window() returned TRUE, then the data in the wimp_draw block will contain enough information to enable our application to perform the operation that the Wimp is requesting. Once the operation is complete, our application should then call Wimp_GetRectangle to ask for further instructions.
extern osbool wimp_get_rectangle(
        wimp_draw *draw
);
As with wimp_redraw_window(), wimp_get_rectangle() takes a pointer to the same wimp_draw block and, if there are further rectangles which need to be redrawn, it will update the contents of the block ready for the next one. It too returns an osbool value to indicate whether the contents of the block needs to be attended to.
Armed with this knowledge, we can conclude that the simplest handler that we can supply for Redraw_Window_Request events is the one in Listing 31.8.
static void results_redraw(wimp_draw *redraw)
{
        osbool more;

        more = wimp_redraw_window(redraw);

        while (more) {
                /* Process the supplied rectangle here... */

                more = wimp_get_rectangle(redraw);
        }
}
Listing 31.8: A very basic redraw event handler
If we add the results_redraw() function to c.results and register it as a handler for the wimp_REDRAW_WINDOW_REQUEST reason code in the results window by adding the following code to results_initialise(), our application will work correctly with the Auto redraw flag turned off in the Results window template.
/* Register event handlers. */

event_add_window_redraw_event(results_handle, results_redraw);
event_add_window_menu(results_handle, results_menu);
event_add_window_menu_selection(results_handle, results_menu_selection);
On receipt of a Redraw_Window_Request event, it will immediately call wimp_redraw_window() as required by the Wimp and record the returned osbool value in more. While more is TRUE, the handler will loop around, giving our application the opportunity to perform whatever redraw operations it needs to and then calling wimp_get_rectangle() to request the next set of data.
The results window still looks exactly as it did in Figure 31.4 because we are not actually doing anything in the loop beyond responding to the Wimp’s requests, but the empty redraw loop is being executed each time the window is drawn or refreshed on screen. The comment “Process the supplied rectangle here...” marks the place where we will need code to handle each of the redraw rectangles that the Wimp supplies to us.
For completeness, the changes so far can be found in Download 31.3.
Plotting some icons
When the Wimp sets up a new redraw rectangle before returning from either Wimp_RedrawWindow or Wimp_GetRectangle, it sets the graphics clip window to the area which it is asking us to redraw. If you’re familiar with BASIC, this is the graphics viewport which is set by a VDU 24 command.
Unless the window’s background colour is set to wimp_COLOUR_TRANSPARENT, the Wimp will also clear the area to the selected colour for us – including plotting the window texture if the colour is wimp_COLOUR_VERY_LIGHT_GREY. In fact, the purpose of the so-called “transparent” window background is simply to prevent the Wimp from plotting it for us: this will generally be because we need to plot it ourselves for some reason, and wish to avoid any flicker caused by filling the area twice in quick succession.
As a result of the clip window being set, there is actually no need for us to restrict our plotting to the area requested. We could – if we so wished – simply plot the whole of our window’s contents for each rectangle that we receive, and leave the graphics system to protect the areas which don’t need to be updated. The main down-side to this approach is that it can be very slow, especially if we have a large work area that is mostly out of view. On the up-side, it’s fairly simple to get working!
When we set up the window template, we sized the work area to accommodate eleven lines: a title row and ten lines of data, each of 52 OS units. The title row is formed from normal icons, so all that we are interested in is redrawing the ten data lines.
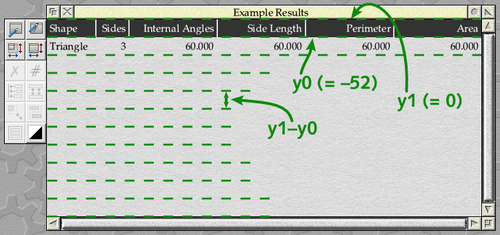
Figure 31.8: Calculating the row heights
Instead of hard-coding the height of a row, we can read it from our window definition. We will keep all eleven lines the same height for the sake of simplicity, so we can get the height of a row from any of the title icons by subtracting y0 from y1 – see Figure 31.8 for the arrangement. One assumption that we will make is that the y1 work area coordinate of the title row is 0 OS units.
int row_height = results_icons[RESULTS_ICON_TITLE_SHAPE].extent.y1 -
                results_icons[RESULTS_ICON_TITLE_SHAPE].extent.y0;
With this information, we can calculate the y1 coordinate for any of the rows in the window using
icon_y1 = -(y * row_height);
(where y is the row number, counting from 1), and then derive the corresponding y0 coordinate from it.
icon_y0 = icon_y1 - row_height;
Armed with this, we can update the results_redraw() function as seen in Listing 31.9, so that it plots all ten rows of the table each time a redraw rectangle is supplied by the Wimp. We’re using a new function, results_plot_icon(), to do the icon plotting – which we haven’t yet defined.
static void results_redraw(wimp_draw *redraw)
{
        osbool more;
        int icon_y0, icon_y1;

        /* Use the shape column to size the row heights. */

        int row_height = results_icons[RESULTS_ICON_TITLE_SHAPE].extent.y1 -
                        results_icons[RESULTS_ICON_TITLE_SHAPE].extent.y0;

        /* Redraw the window. */

        more = wimp_redraw_window(redraw);

        while (more) {
                for (int y = 1; y <= RESULTS_MAX_ROWS; y++) {
                        icon_y1 = -(y * row_height);
                        icon_y0 = icon_y1 - row_height;

                        results_plot_icon(RESULTS_ICON_ROW_SHAPE, icon_y0, icon_y1);
                        results_plot_icon(RESULTS_ICON_ROW_SIDES, icon_y0, icon_y1);
                        results_plot_icon(RESULTS_ICON_ROW_INTERNAL_ANGLES, icon_y0, icon_y1);
                        results_plot_icon(RESULTS_ICON_ROW_SIDE_LENGTH, icon_y0, icon_y1);
                        results_plot_icon(RESULTS_ICON_ROW_PERIMETER, icon_y0, icon_y1);
                        results_plot_icon(RESULTS_ICON_ROW_AREA, icon_y0, icon_y1);
                }

                more = wimp_get_rectangle(redraw);
        }
}
Listing 31.9: Redrawing all of the lines in the table
Unlike RESULTS_ICON_TITLE_SHAPE and its siblings, which we left in the window definition that we passed to Wimp_CreateWindow, RESULTS_ICON_ROW_SHAPE and the other icons being passed to results_plot_icon() are the ones that we removed from the template by adjusting window_definition->icon_count. This means that they don’t exist as icons in the window: they are only icon definitions in our window definition block, which we will use for performing our window’s redraw.
To do this, we will need a new Wimp SWI: Wimp_PlotIcon. Like Wimp_CreateIcon, this takes a pointer to an icon definition block – but instead of using it to create a new icon, it uses the Wimp’s icon plotting routines to draw it to the screen. Wimp_PlotIcon is usually intended to be called from within a redraw loop and so, since icon defintions don’t contain a window handle, the Wimp assumes that the window is the one currently being redrawn. As a result, the coordinates used to define the icon’s position are work coordinates within our window.
This means that the code needed within our new results_plot_icon() function is relatively simple. The icons don’t move horizontally within the window compared to where we placed them in the template, so all that we need to do is to set extent.y0 and extent.y1 in the icon definition to the values calculated in results_redraw() – we can access these via the global results_icons variable that we set up for the purpose in results_initialise().
With the values updated, we then pass a pointer to the definition to wimp_plot_icon() as seen in Listing 31.10.
static void results_plot_icon(wimp_i icon, int y0, int y1)
{
        results_icons[icon].extent.y0 = y0;
        results_icons[icon].extent.y1 = y1;

        wimp_plot_icon(results_icons + icon);
}
Listing 31.10: Calling Wimp_PlotIcon
If we compile and run this code now, we should find that we get ten copies of the placeholder line in our window, beneath the title row – as seen in Figure 31.9.

Figure 31.9: Our window being redrawn
Once again, for completeness, the changes so far can be found in Download 31.4.
Narrowing things down
Whilst the code above undoubtedly works, it’s hardly efficient as we’re redrawing all ten lines in the window each time we’re given a rectangle by the Wimp. This might be acceptable for just ten lines, but what if we had one hundred or one thousand? Or perhaps a complex, multi-page document?
Fortunately, when returning from Wimp_RedrawWindow and Wimp_GetRectangle, the Wimp puts some useful information into the wimp_draw structure alongside the window handle in w.
struct wimp_draw
{
        wimp_w  w;
        os_box  box;
        int     xscroll;
        int     yscroll;
        os_box  clip;
};

typedef struct wimp_draw wimp_draw;
The values within the clip structure give us the position of the graphics clip window which has been set for us, in terms of screen coordinates. As we have come to expect, x0 and y0 are supplied inclusively, whilst x1 and y1 are exclusive. The other values – the contents of the box structure, along with the xscroll and yscroll variables – give us the window’s visible area and scroll offsets, in a form that should be very familiar to us by now.
We have already seen how to convert the screen coordinates of a mouse click into work area coordinates, and the maths that we will need to do here is very similar. The first thing that we need to do is to work out in terms of screen coordinates where the origin of the window’s work area lies, as shown in Figure 31.10.
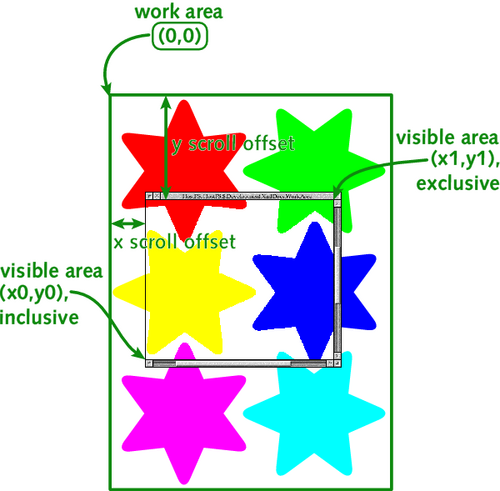
Figure 31.10: Finding the work area coordinate origin
Using maths which should by now be second-nature, we can get the x origin by taking the x0 coordinate of the visible area and subtracting the horizontal scroll offset. In a similar way, the y origin can be found by taking the y1 coordinate of the visible area and subtracting the vertical scroll offset.
int ox = redraw->box.x0 - redraw->xscroll;
int oy = redraw->box.y1 - redraw->yscroll;
The values now in variables ox and oy represent the origin of the window’s work area in terms of screen coordinates. They will be useful to us within the redraw loop because they will allow us to convert between work area coordinates and screen coordinates. If we wanted to calculate the position of the clip window in terms of work area coordinates, we can take the screen coordinates from the clip structure and subtract the work area origin values.
int top = redraw->clip.y1 - oy;
int bottom = redraw->clip.y0 - oy;
int left = redraw->clip.x0 - ox;
int right = redraw->clip.x1 - ox;
The vertical work area coordinates are conventionally negative, so if we’re planning to use the values as indexes into an array of data it might be useful to negate them.
int top = -(redraw->clip.y1 - oy);
int bottom = -(redraw->clip.y0 - oy);
From here, a little bit of rearrangement gives is the following.
int top = oy - redraw->clip.y1;
int bottom = oy - redraw->clip.y0;
If we then divide top and bottom by the row_height, we can add some vertical bounds checks to our redraw loop as seen in Listing 31.11. We’re adjusting bottom by 1 before the division to allow for the fact that the y1 values are exclusive.
static void results_redraw(wimp_draw *redraw)
{
        osbool more;
        int oy, top, bottom, icon_y0, icon_y1;

        /* Use the shape column to size the row heights. */

        int row_height = results_icons[RESULTS_ICON_TITLE_SHAPE].extent.y1 -
                        results_icons[RESULTS_ICON_TITLE_SHAPE].extent.y0;

        /* Redraw the window. */

        more = wimp_redraw_window(redraw);

        while (more) {
                oy = redraw->box.y1 - redraw->yscroll;

                top = (oy - redraw->clip.y1) / row_height;
                if (top < 1)
                        top = 1;

                bottom = ((oy - redraw->clip.y0) - 1) / row_height;
                if (bottom > RESULTS_MAX_ROWS)
                        bottom = RESULTS_MAX_ROWS;

                for (int y = top; y <= bottom; y++) {
                        icon_y1 = -(y * row_height);
                        icon_y0 = icon_y1 - row_height;

                        results_plot_icon(RESULTS_ICON_ROW_SHAPE, icon_y0, icon_y1);
                        results_plot_icon(RESULTS_ICON_ROW_SIDES, icon_y0, icon_y1);
                        results_plot_icon(RESULTS_ICON_ROW_INTERNAL_ANGLES, icon_y0, icon_y1);
                        results_plot_icon(RESULTS_ICON_ROW_SIDE_LENGTH, icon_y0, icon_y1);
                        results_plot_icon(RESULTS_ICON_ROW_PERIMETER, icon_y0, icon_y1);
                        results_plot_icon(RESULTS_ICON_ROW_AREA, icon_y0, icon_y1);
                }

                more = wimp_get_rectangle(redraw);
        }
}
Listing 31.11: Redrawing just the lines that we need to
We are including the title row in our calculation as row 0, but since we will never need to redraw this we bounds-check top to make sure that we never start redrawing before row 1. Any attempt to redraw just row 0 will drop out in the for () loop, because bottom will be 0 in that situation. We similarly check that bottom never goes above the maximum number of rows that we can have.
One thing to note is that we haven’t bothered to bounds check the redraw horizontally: we just plot all of the icons in each row. This is a trade-off: it’s fairly easy to narrow down the area by row, but detecting the column boundaries would be a lot more work and the payoff probably wouldn’t justify the complexity of the resulting code. It is always worth thinking about the benefits of adding additional complexity to the redraw code, and – ideally – testing solutions on a range of hardware before making things too complicated.
Putting the code together gives us the application in Download 31.4.
There has been a lot of theory in this chapter but, while we now have a functional redraw loop, we still have no data to redraw. We will solve that problem in the next chapter, however, so that our Results window can finally do something useful!